Table of Contents
Overview
In an era, where the automotive sector is at its prime and everyone desires to make their career advancements in the Automotive field, there is a need for a Microcontroller based development board that is of automotive grade, with automotive capabilities to do hands-on learning and gain knowledge on automotive skill sets. And in such a world, ElecronicsV2 boards make a grand entrance.
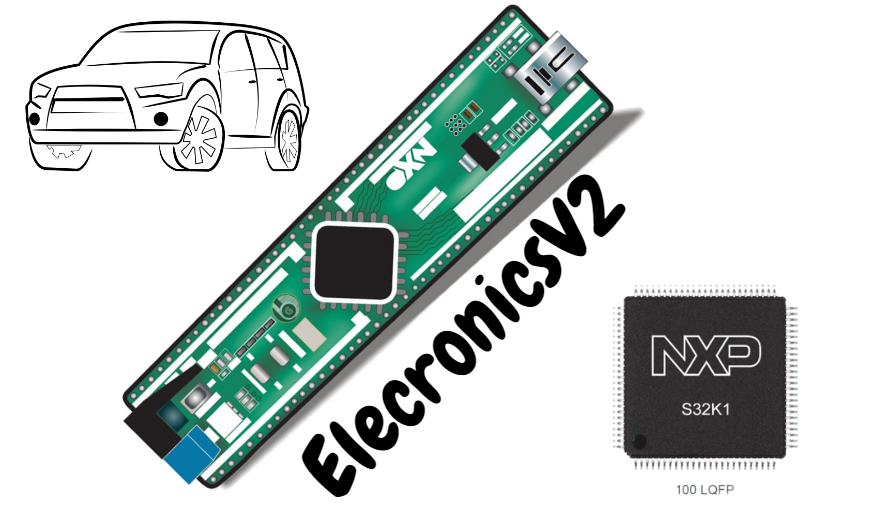
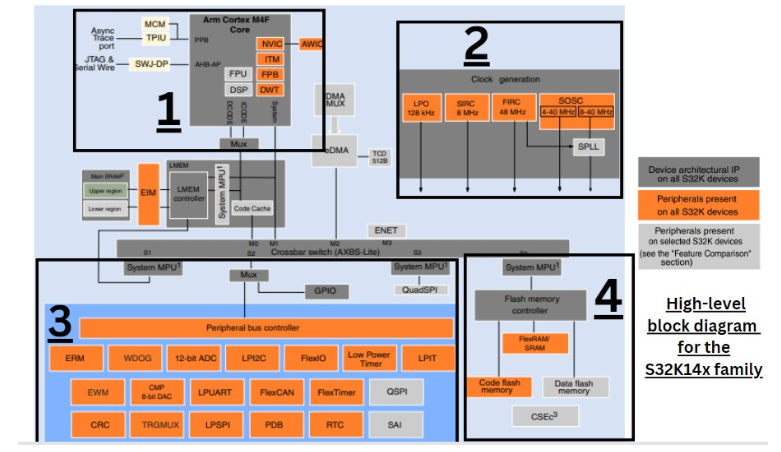
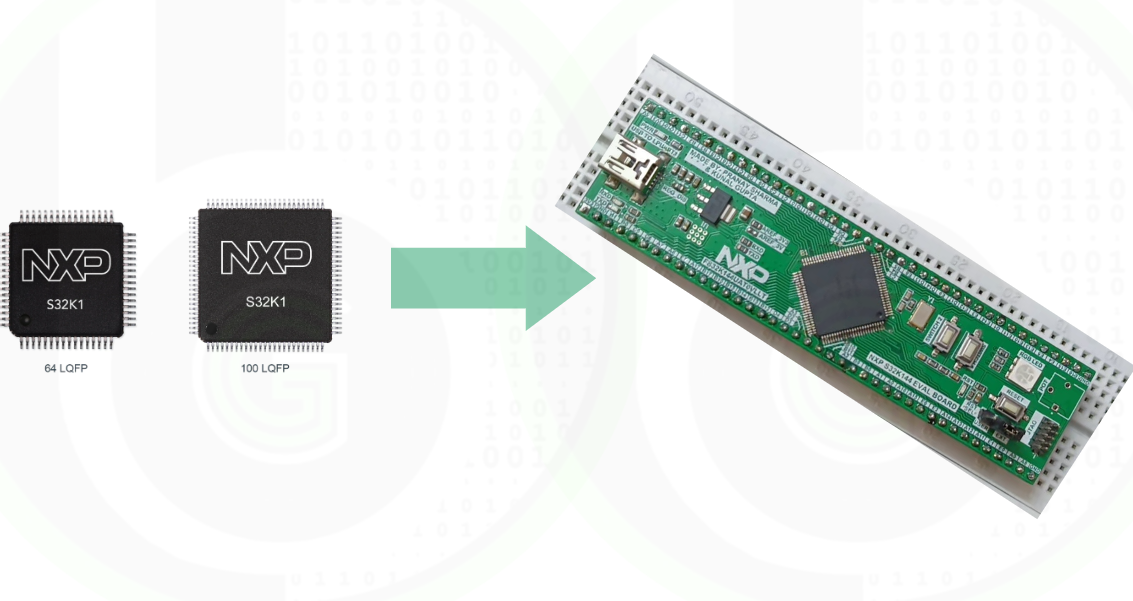
ElecronicsV2 is a development Board based on NXP Semiconductor S32K144 MCU. The development board has a rich set of onboard features and interfaces to make Automotive DIY projects. It is powered with S32K144 MCU, which is based on ARM Cortex M4 Core with Automotive peripherals like CAN, LIN, FlexIO, SAE-J2602, Half HSM, and advanced Timer peripheral.
ElecronicsV2 is not just a development board for Automotive, but it is also a prime candidate for students, working professionals, and hobbyists to learn embedded projects and learning in an industrial Microcontroller out of Arduino and ESP environment. ElecronicsV2 is based on the S32K144 Microcontroller.
S32K144 MCU is part of the S32 family of microcontrollers, for which NXP semiconductors provide a dedicated IDE for embedded software development and SDK for embedded application development. What makes the S32K144 apart, is its availability of SDK with Autosar standard!! Students and working professionals can do Autosar-based and hands-on learning using the Autosar MCAL SDK. All of this is possible/done via the ElecronicsV2 board.
Elecronics V2 Development Board
Elecronics V2: is a development board that is designed based on NXP Semiconductors S32K144 MCU by Gettobyte Community.
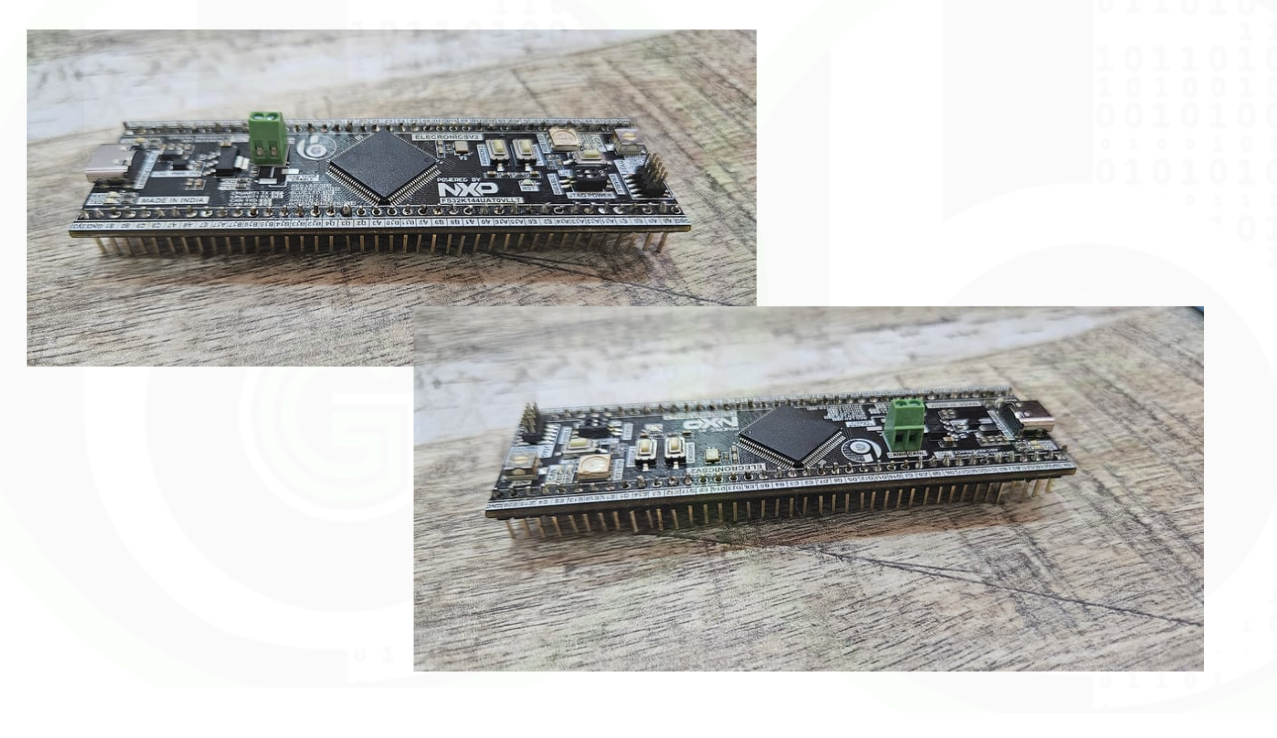
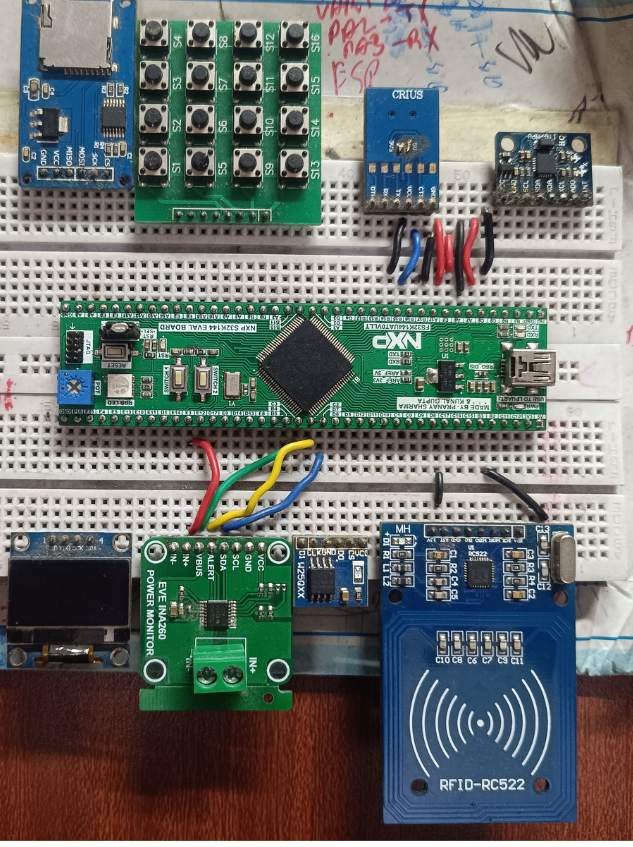
ElecronicsV2 is a breadboard-compatible board, which has all Input/Output pins exposed via male headers and can be expanded by embedding it into the breadboard for easy use and development. S32K144 microcontroller can be used for various industrial projects like Automotive, Industrial Automation, consumer electronics, and IoT. This board is cost-effective as compared to the original evaluation board of S32K144.
Documentation on ElecronicsV2 Board: User Manual of ElecronicsV2 Board
Getting Started with ElecronicsV2 Board: Getting started with ElecronicsV2 Board
…………………………………..
The major challenge people face is a lack of resources or scattered content to learn and do hands-on such Industrial microcontrollers. For learning the Embedded basics and firmware development on this board, viewers can refer to the tutorial blog series on the S32K144 microcontroller. Refer to this link for more info.
Features of ElecronicsV2 Development Board
ElecronicsV1 is breadboard compatible development based on NXP Semiconductors S32K144 MCU. Which has following features:
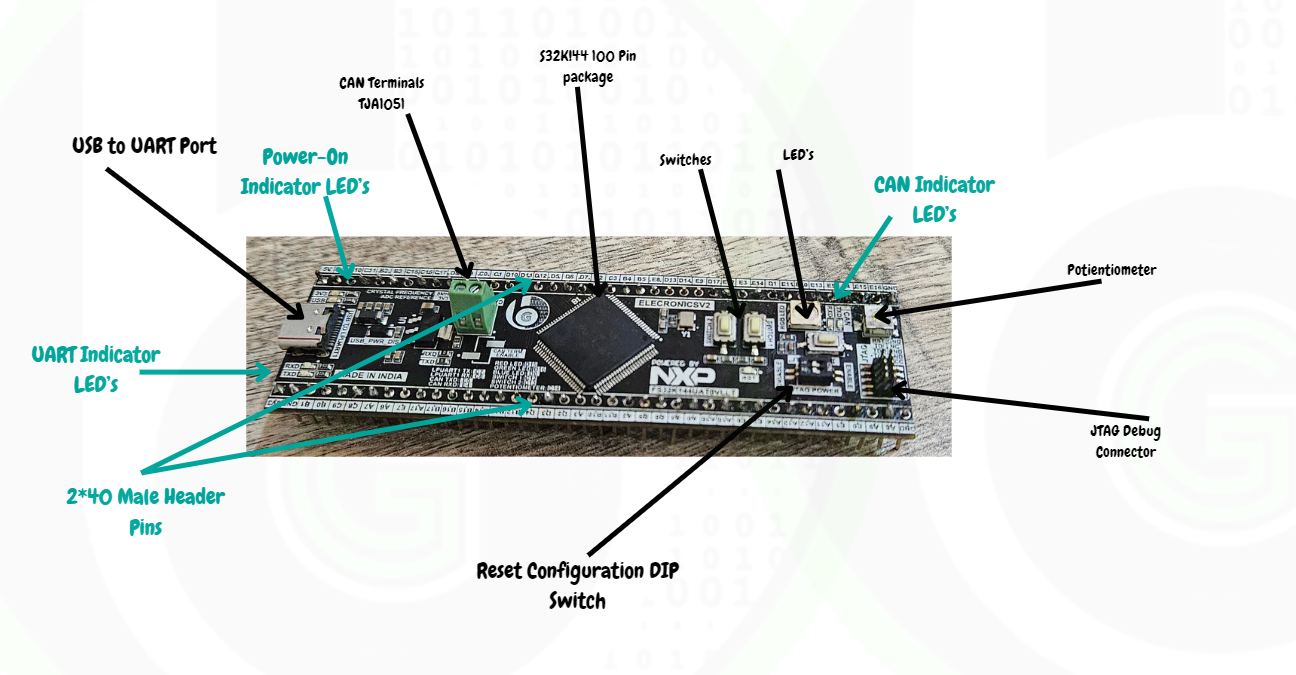
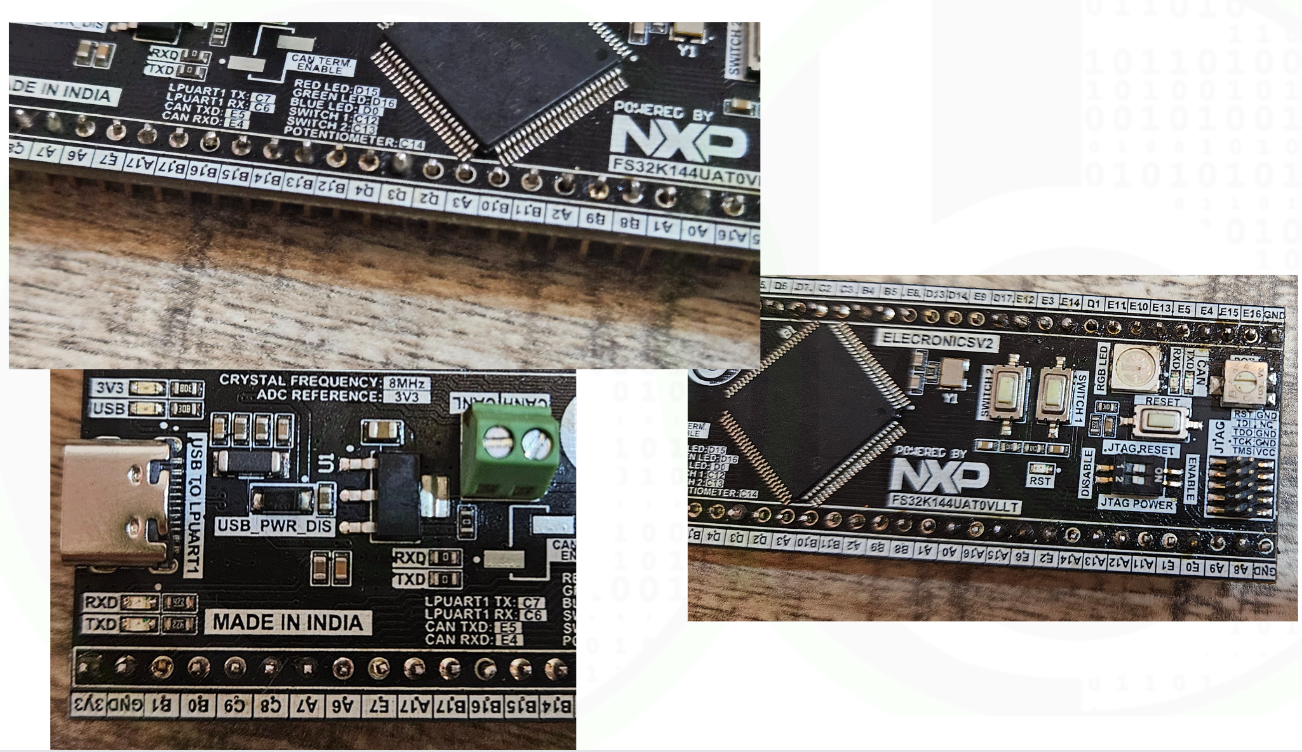
Their are 2 Best Things about the design of the ElecronicsV2 Board:
- First is 2*40 male header pins, which exposes all the pins of the Microcontroller and it can be easily connected to a number of sensor/modules with neat and clean connections
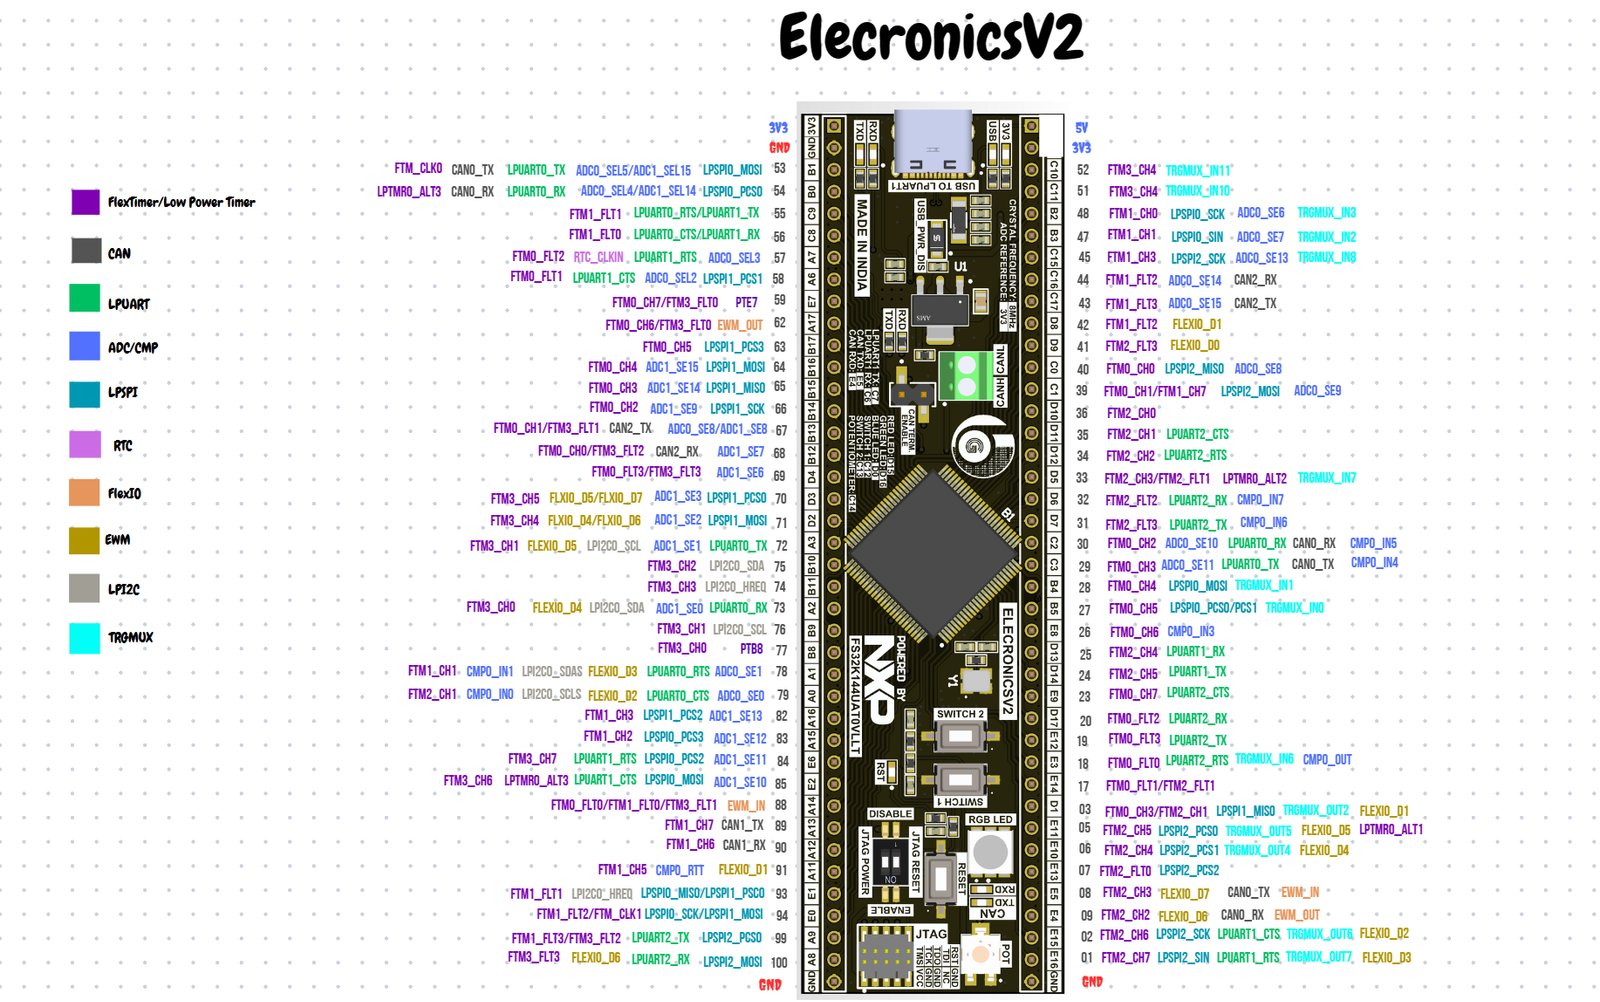
- Another thing is the silkscreen present on the board. On the ElecronicsV2 you can see there is pin labeling for all the features present on the board, which makes it easy for users to do development on the board, instead of seeing pinouts/schematics again and again.
Pinout of ElecronicsV2
About S32K144 MCU
Refer to this blog, to know indepth features and specs of the S32K144 MCU:
Reasons for starting your journey with S32K144 MCU as students/hobbyiest
- The most important reason for selecting this microcontroller is it has Software stack/drivers for S32K144 MCU with Autosar complaint MCAL Layer, which will help students learn about Autosar at the college level using ElecronicsV1 by making DIY projects just like on Arduino. Autosar is one of the highly demanded skills set in embedded and automotive industry.
- S32K144 MCU has many Automotive communication protocols like: CAN, LIN, FlexIO, Motor control-based TIMER Peripheral, CSEc Hardware Security Module to implement Cryptography Application. So using this board will give students understanding and hands-on industrial level knowledge of automotive/embedded field.
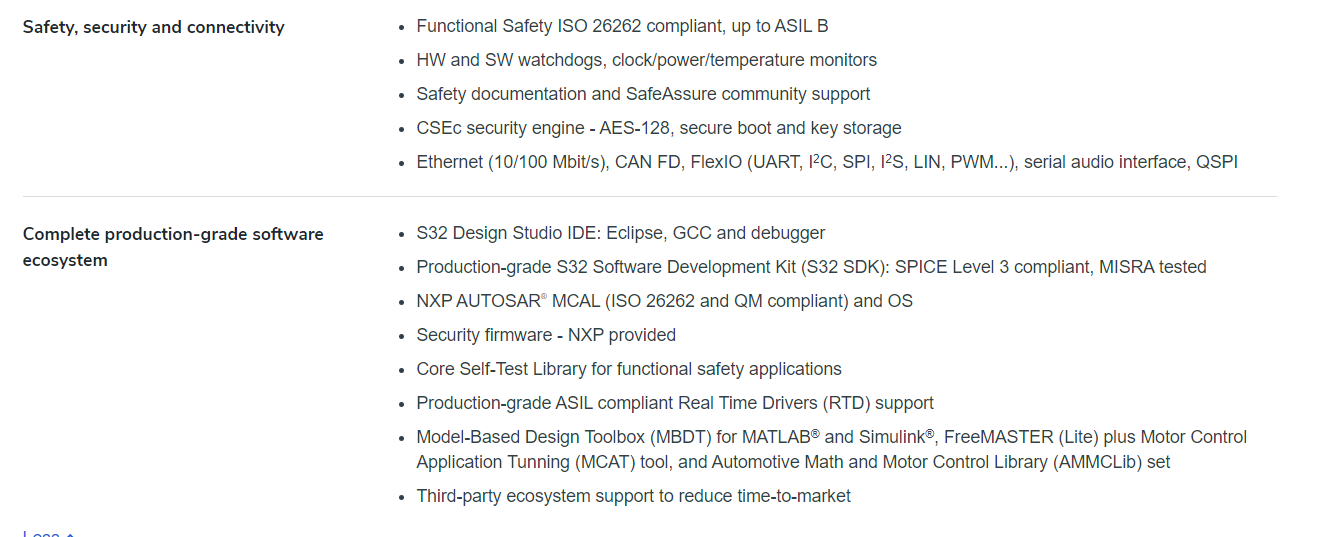
- Based on ARM Cortex M4 processor running at 112MHz, students can explore and learn about ARM technology by doing hands-on via this controller and using its IDE: S32DS.
Debugger/Programmer
The board doesn’t have on-board debugger, so it has to be programmed using external debugger like: J-Link Debuggers or PEmicro OpenSDA debugger.
Original Jlink debugger and PEmicro debugger comes very expensive, so best and reliable alternate to those debuggers i to buy JLink V9 Debugger Emulator – ARM MCU Development Tool, which comes at a cost of 2.5K around and using this debugger you can debug any ARM cortex M3/M4 chip. More details and how to use this debugger is here.
JlinkV9 Debugger is Chinese clone of the original Jlink Base Debugger which is best to use by students/hobbyists and affordable too.
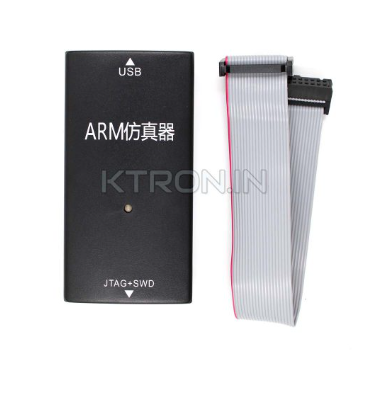
Viewers can buy the debugger from here: Buy JLink V9 Debugger Emulator – ARM MCU Development Tool – KTRON India.
It comes at a cost of 2.5K around. Buying this debugger once and then it can be used with any ARM Cortex M based Microcontroller.
Other alternative for debuggers:
Target Audeince for the board
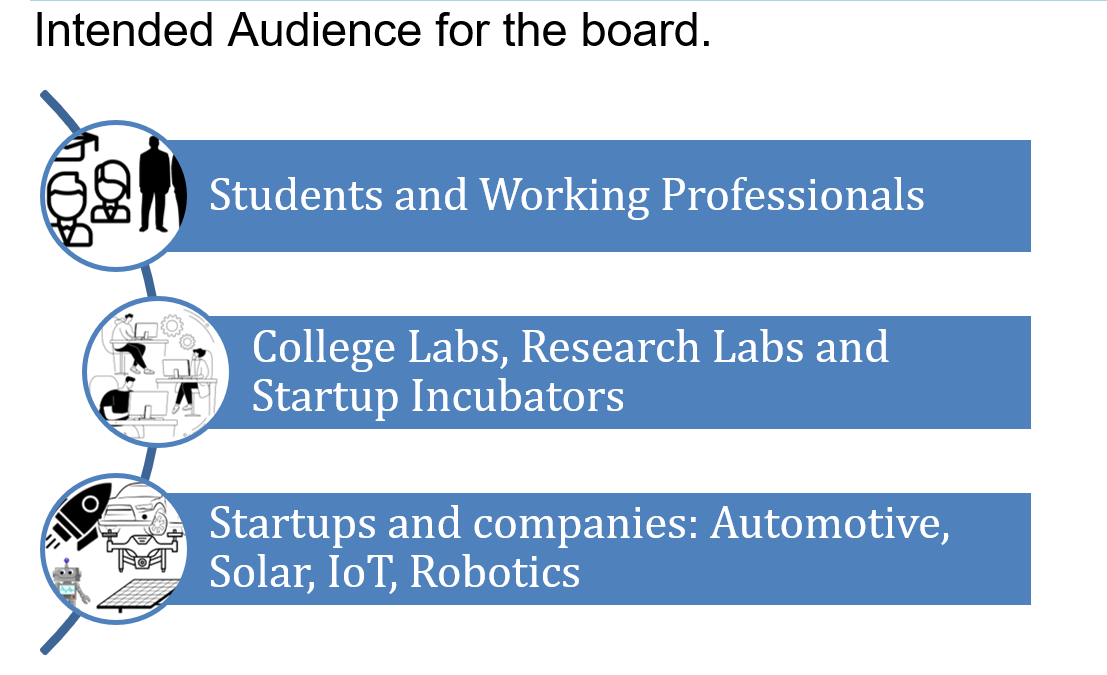
The board can be used by variety of audience and applications as follows:
- It can be used by students and practise enginners for learning Embedded systems on Industrial Microcontrollers like that of NXP Semiconductors to come out of Arduino and ESP environment and making DIY projects for different Industries, giving them industrial exposure and skillsets. Thus, this microcontroller is perfect start for students to get hand-on exposure on industrial technologies.
- Not only for DIY projects but this board can be used for fast prototyping and development by automotive/EV based startups/companies for their product development. As S32K144 MCU is ARM cortex M4 based and has rich set of peripherals with automotive certified standards for developing products for body & control, powertrain and electrification domains of the car.
Buy the board
The board is priced at INR 4,999(Excluding GST and Shipping Charges).
For college students, ElecronicsV2 is of 2,999. For students, there is a discount of INR 2000. They have to submit their student ID and government ID, after the verification from our end, their order will be processed.
The Kit will include, Jlink V9 debug Users can buy from above link:
- One ElecronicsV2 Development Board
- JTAG-SWD Debug Adaptor
- 10 Pin JTAG debug connecting wire
Getting Started with Board
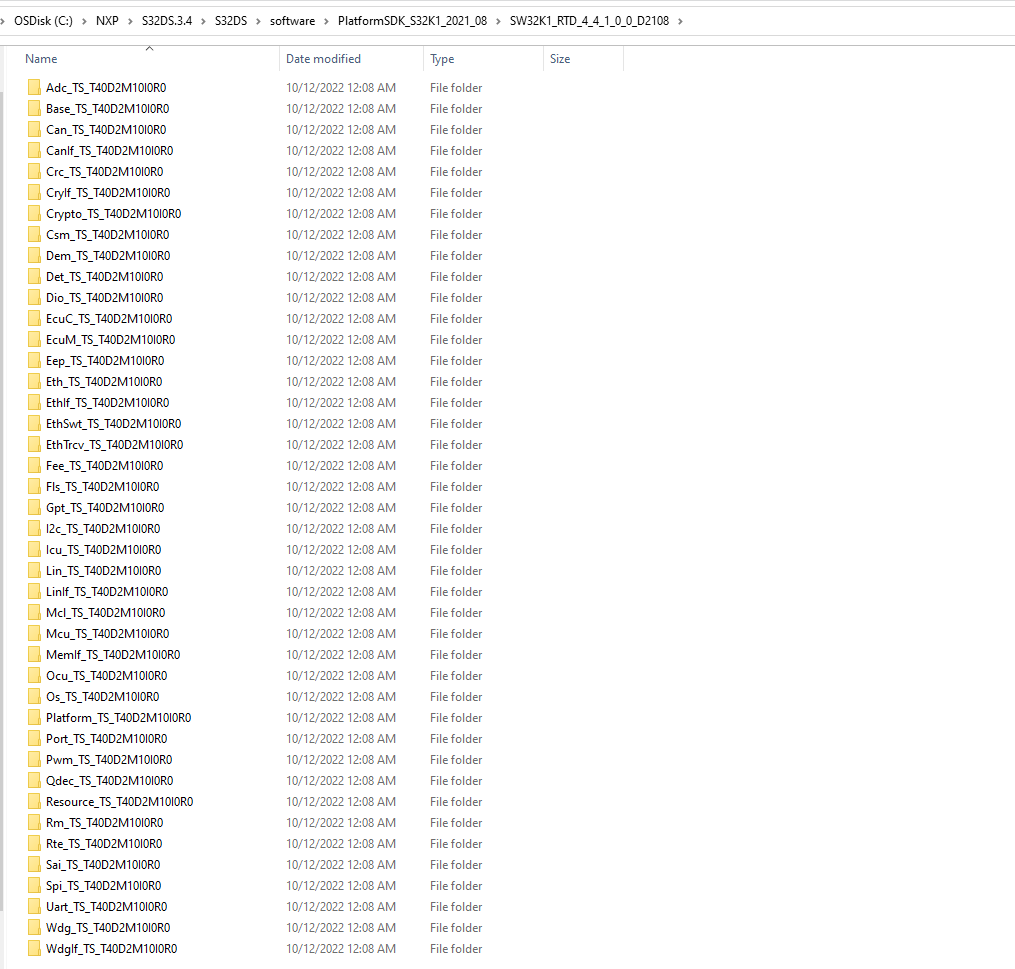
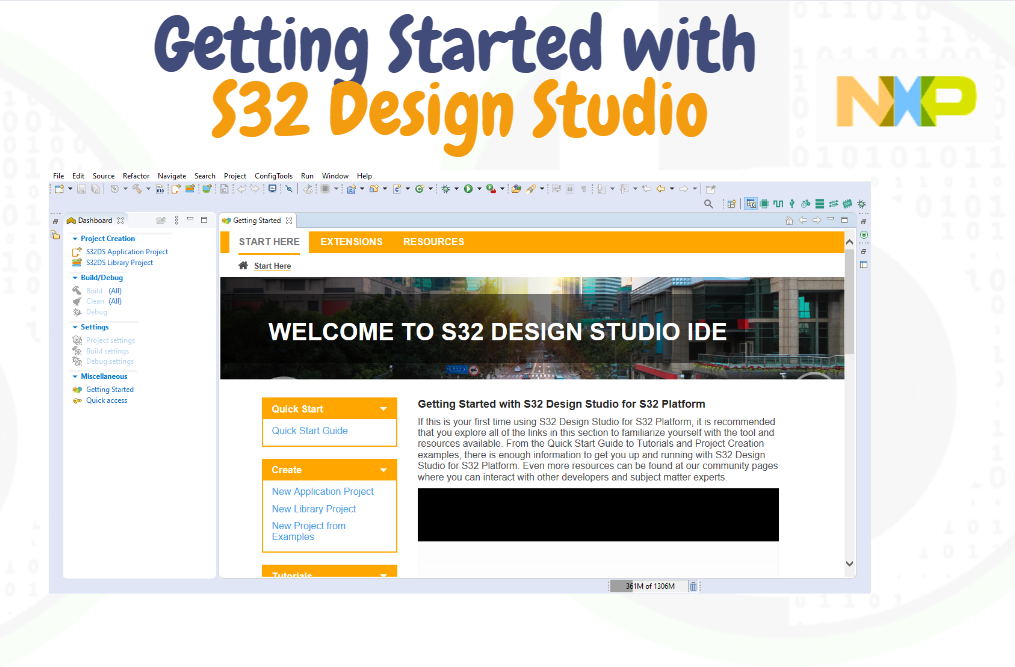
For using the S32K144 MCU, NXP semiconductors provides S32Design Studio IDE and S32K1 Software Package. S32K1 Software package has all the peripheral drivers, example codes, middleware stacks for starting development/learning on S32K144 MCU. on Refer above video to get started with ElectronicsV1 board and how to setup S32K144 SDK.
Further viewers can refer to blog series on S32K144 MCU, to do hands-on learning on all of its peripherals and then do sensor-module/DIY Projects interfacing with using ElecronicsV1 board.
Chronological order to start with this board:
Kunal Gupta
PWM Driver of Autosar MCAL Layer
PWM Driver of Autosar MCAL layer Explanation, Understanding and tutorial using ElecronicsV3 Development board
Freemaster Visualisation for ADC Peripheral(MCAL Based)
Integration of FreeMaster Software with ElecronicsV3 Board (S32K144 MCU) via UART Driver of Autosar MCAL Layer
SAR ADC Explained!
What is difference between SAR and sigma delta ADC? How does ADC Peripheral in MCU’s work
Potentiometer Interfacing with S32K144(Elecroncics V3)
Interfacing10KOhm Potentiometer using ADC Driver of Autosar MCAL Layer via ElecronicsV3 Board (S32K144 MCU)
Autosar MCAL layer ADC Driver API’s and data types explanation
API name: Adc_Init() void Adc_Init (const Adc_ConfigType* ConfigPtr) Role: Adc_Init() API initializes the ADC peripheral of the microcontroller. This API is universal and used across all automotive MCUs for initializing the ADC peripheral of the corresponding MCU. This API initializes the registers of ADC peripherals internally. So function definition of Adc_Init () would be different for different SoCs. But in applications across all automotive MCUs, this API name and syntax would be used to initialize the ADC peripheral according to the Adc_ConfigType structure. Working of this API: This API calls the low-level functions that configure the ADC clock, prescaler, and trigger mode. This API initializes all the ADC instances, according to their configurations for ADC Hardware Unit. This API does not configure the pins of the MCU to analog pins. That part has to be done by the Port or MCU driver. Parameter passed: The parameter that is passed to this API is of Adc_ConfigType data type. Adc_ConfigType is a structure that contains the set of configuration parameters for initializing the ADC Driver and ADC HW units. The object of this data type is generated and defined by the configurator tool. We users don’t have to initialize this object. It is automatically configured based on the configuration we do on the GUI. We just have to send the object of Adc_ConfigType with ampersand (&) to this API. Chronology to use this API: This API is used in the beginning of main(). Just after the system clock and ADC pins are configured by their respective APIs. Return value: This function does not return anything. As it only initializes the internal peripheral registers. But just to check and verify the function, you can observe the changes in ADC HW unit registers just after executing this function. Syntax to use this API: Adc_Init(&Adc_Config_VS_0); ADC Peripheral Registers affected by This API, with respect to S32K144 MCU using ElecronicsV3 Board: API Name: Adc_EnableGroupNotification void Adc_EnableGroupNotification(Adc_GroupType Group) Role: This API, enables the notification feature when conversion of all channels of the ADC group is successfully converted. Working of this API: After starting the ADC conversion either by software trigger or hardware trigger, the group notification function will be called only if its group notification is enabled. And that thing is done by this API. That’s why, in this API we just send one parameter, Group Number. The ADC Group Notification callback function is called from the IRQ handler of ADC. ADC MCAL layer has a defined IRQ notification callback function, that is called when the IRQ handler of ADC is invoked upon successful conversion of ADC channels. And IRQ Notification callback function calls the group-specific notification callback and updates the Group Status to ADC Completed/ADC Stream Completed. For a single ADC hardware unit in a microcontroller, ADC IRQ is the same for all channels. So upon successful conversion of ADC of a channel IRQ handler notification is called, into which analysis is done that which channel of which group is completed and corresponding to that group notification callback is invoked. Parameter passed: The parameter that is passed to this API is of Adc_GroupType data type. Adc_GroupType is a typedef of uint16. It is just a numeric ID ( 1,2,3,4 etc), denoting the ADC group number. The values of Group IDs are generated and initialized by the code configurator tool. We users don’t have to initialize the group ID number. The group IDs are automatically macro-defined based on the GUI configuration tool. We just have to send the macro-defined group name in this API. Prerequisite: ADC should be used with Interrupts capability. If no interrupts are used, no notification capability will be invoked. The ADC Notification capability checkbox has to be checked in the AdcGeneral section of the ADC configurator tool. If this is not checked, the notification capability will not work. Make sure that we have configured the ADC Group Notification function in the configurator tool while configuring the ADC groups. // photo The name that would be written over here, the function of that name only will be created in generated files and we can define the function in the application code on how to use it and what to do. Chronology: This API is used just after the Adc_init () and before calling the application loop that involves the use of ADC conversion. Return value: This function does not return anything. As it only initializes the internal state to enable the notifications. Syntax to use this API: Adc_EnableGroupNotification(AdcGroup_0); API Name: Adc_StartGroupConversion() void Adc_StartGroupConversion(Adc_GroupType Group) Role: This API initializes the conversion of channels of the group which is triggered by software. This API starts the conversion of the ADC group which is configured to get triggered via a Software Trigger. Hardware Trigger ADC groups are not started via this API. After the usage of this API, the ADC conversion of channels that are referred by a single group would begin, and we can expect corresponding group notifications to be called. And to see the results of ADC conversion we can use the Adc_ReadGroup(). Working: This API initializes the internal ADC peripheral register of ADC channels of the group which has to be converted. It also writes on those peripheral registers which starts the ADC conversion by Software trigger. Parameters: The parameter that is passed to this API is of Adc_GroupType data type. Adc_GroupType is a typedef of uint16. It is just a numeric ID ( 1,2,3,4 etc), denoting the ADC group number. The values of Group IDs are generated and initialized by the configurator tool. We users don’t have to initialize the group ID number. The group IDs are automatically macro-defined based on the GUI configuration tool. We just have to send the macro-defined group name in this API. Prerequisite: The ADC module should be initialized with Adc_Init() API and ADC notifications of the group should be enabled. Syntax to this API: Adc_StartGroupConversion(AdcGroup_0); API Name: Adc_EnableHardwareTrigger() void Adc_EnableHardwareTrigger(Adc_GroupType Group) Role: This API initializes the conversion of channels of the group
ADC Driver of Autosar MCAL Layer
ADC Driver of Autosar MCAL layer Explanation, Understanding and tutorial using ElecronicsV3 Development board
Add Your Heading Text Here
Author: Kunal Gupta
Author