Overview

So hello guys, welcome back to another series of Microcontroller tutorials. As Microcontrollers are new big thing happening across the globe, but to learn about microcontrollers becomes quite challenging as most of the content on web is theoretical based and quite unorganized. Or the content is only roaming around 2-3 microcontrollers (Arduino, ESP or PIC), even though there are number of Microcontrollers of different vendors. Also, framework of Arduino and Arduino IDE hides most of the things that are going inside the microcontrollers.

Here at Gettobyte, you will get content on microcontroller tutorials for different vendors and much more via practical way. Which will help you to learn important skills to build you Carrer on Semiconductor Industry and also help you in product development/DIY projects for different Industries, so as to make embedded devices with Industry standard Microcontroller.

Would recommend viewers to read below blogs, if you are newbie, who is just coming from Arduino environment and wanna explore microcontrollers and wanna build Carrer into semiconductor industry, then this blog will give you overview of what all things are there to be needed for making projects and to play along with the different microcontrollers.

Table of Contents

This Time we are going to start with NXP Semiconductors S32K144 automotive MCU. Objective of this blog, will be to:

  • –> Learn About NXP Semiconductors.
  • –> Get to know about S32, S32K & S32K144 Platform of NXP Semiconductor.
  • –> Hardware Development Kit of S32K144 MCU.
  • –> Software Development Kit of S32K144

After this Introduction blog on s32K144 MCU, we will be doing hands on different peripherals of this MCU starting with GPIO, UART, I2C, SPI and…

About NXP Semiconductor

NXP Semiconductors is a global semiconductor company that designs and produces a broad range of semiconductor solutions providing hardware and software for them. It is a fabless company that designs the Microcontrollers, Microprocessor, ASICS’s and other discrete electronic components, targeting the industries like but not only limited to automotive, industrial automation, communication infrastructure, IoT, Robotics, Medical, Consumer Electronics, drones and Security Chips.

Apart from these chips and IC’s, NXP semiconductors also provide software to run these chips and demonstrating different applications where its products can be used. NXP semiconductor also works in AI/ML and edge computing.Making it not only giant hardware-based semiconductor company but software company too.

History of NXP Semiconductors roots back to 1950’s. It was founded in 1953 as part of the electronics giant Philips, at that time the company name is Philips Semiconductors. In 2006 it become independent company and its name changed to present name: NXP Semiconductors. After that it had acquired several companies and had done partnership deals with companies like Silicon labs, STMicroelectronics, Trident Microsystems, Conexant Systems and to expand its product lines and business revenue. In March 2015, merger agreement was announced through which NXP semiconductors acquired The Freescale semiconductors. After this merger NXP semiconductor become one of the largest semiconductor companies in the world. Both NXP and Freescale had deep roots stretching back to when they were part of Philips (NXP), and Motorola (Freescale). NXP primarily focusing on near field communication (NFC) and high-performance mixed signal (HPMS) hardware, and Freescale focusing on its microprocessor and microcontroller businesses. NXP semiconductor chips are used in almost every electronic gadget we see around us. To know more about NXP semiconductors, one can navigate to NXP website and Wiki page.

In this blog we are going to start with Automotive Industry. NXP semiconductors has a S32 Platform of microcontrollers and microprocessors specially targeting the Automotive industry. S32 platform has all the kind of MCU’s and MPU’s targeting different Domains of Automotive. There are broadly five domains in automotivePower Train, Chassis, Body & Comfort, HMI, and
Telematics. These 5 domains cover all the devices embedded in Automotive.

About NXP S32 Platform

S32 is a series of Microcontroller which are designed and manufactures by NXP Semiconductors, specially targeting for automotive applications but not only limited to them. Then with in S32, there are further categories as S32K, S32G, S32R, S32V.
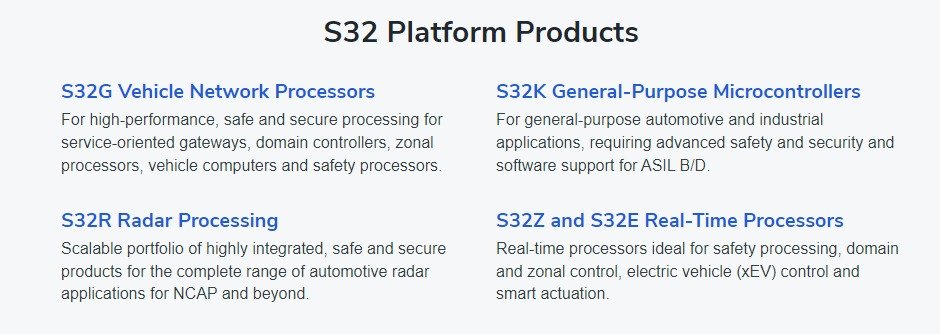
NXP S32 Product Platform

Each of the category, can be used in one of the domains of automotive. Like say in powertrain one can use S32K for motor control applications and for telematics one can use S32R for radar processing, to get information about nearby objects. This is what something ADAS system is. Like when some car come nearby to a car, some sensor senses that distance (That is telematics zone) and after a certain threshold car speed automatically changes by controlling its motor RPM (that is part of powertrain).

NXP S32 Platform is being designed, providing end to end solutions for Automotive Industry. Not only MCU’s and MPU’s but NXP also provides large number of tools and software to build the applications for Automotive from S32 Platform. Dedicated IDE, Debugging tools and drivers, Real-time Drivers (RTD), RTOSes(FreeRTOS, Zephyr, NXP RTOS) and Autosar complaint SDK.

Almost every MCU of S32 family has support of Automotive protocols: CAN, LIN, FlexIO and etc. Ranging from ARM CortexM3(single core) to ARM Cortex A9(triple core). Having advance features to support automotive needs like : Hardware security modules(HSM) for safety and security, High Bandwidth Ethernet and USB support for connectivity and etc.

We are going to start with S32K312 MCU, which is part of S32K family. It is based on ARM Cortex M7 and has dedicated HSM-H that too upto EVITA specs and also ASIB/D complaint. Making it a perfect MCU to start for building general purpose Automotive applications.

Would get to know more about S32 platform along with tutorial series on S32K312 MCU. 

S32K MCU family series

We are going to start with S32K platform which are general purpose Microcontrollers designed to make different ECU in zonal and body control modules for automotive applications.

NXP S32K1 MCU series

S32K is further categorized into S32K1 and S32K3 series. S32K144 is part of S32K1 series.

About S32K144 MCU

S32K144 MCU is part of the S32K series of MCU of NXP, which are General purpose Microcontrollers for developing body & control, powertrain related applications automotive Industry. S32K144 is single core ARM cortex M4F processor based MCU with rich set of peripherals for Automotive Industry.

  • It has upto 89 General Purpose Input/Output (GPIO) pins for connecting large number of I/O sensors and modules to act as HMI, thus perfect choice for acting as ECU node in domain or zonal Architecture of E/E automotive.
  • It has 512 KB of on chip flash memory and 256KB of SRAM with ECC feature to have secure memory regions.
  • It operates at Voltage range (Vdd) of 2.7V to 5.5V, with temperature range of -40 to 150 degree Celsius.

Means if Voltage of 2.7V is supplied to IC then it will recognize input signal of 1.89V(0.7* Vdd) to 3V (Vdd+ 0.3) as High signal and input signal of -0.3V(Vss-0.3) to 0.81V(0.3*Vdd) as Low Signal. If Voltage of 5.5V(Vdd) is supplied to IC, then it will recognize input signal of 3.5V(0.65*Vdd) to 5.8V(Vdd+0.3) as High Signal and input signal of -0.3V(Vss-0.3) to 1.9V(0.35*Vdd) as Low Signal.            (Analyzed from DC electrical specification of S32K1-DS)

Thus, IC can be used to measure Input signals for low voltage sensors like accelerometers, Capacitive and Inductive sensors.

  • S32K144 IC has Arm Cortex M4 core, with Integrated DSP, Configured NVIC, Single Precision FPU and Debug CoreSite architecture. ARM Cortex M4 Core supports ARMv7 Architecture and Thumb2-ISA.
  •  IC can run up to at 112MHZ frequency when running at System Phase Locked Loop (SPLL). It has Fast Internal RC Oscillator (FIRC), Slow Internal RC Oscillator (SIRC), Low Power Oscillator (LPO), Real Time Counter External clock (RTC_CLK).
  • ADC peripheral is essential for applications involving Electrification. Thus, IC has two 12-bit SAR ADC modules of 16 channels. IC also has 8-bit internal DAC module for integrating power IC\’s in the case of electrification.
  •  IC also has onchip Debug facilities of Serial Wire Debug (SWD), Serial Wire Output (SWO) and JTAG combined. And IC inherits the CoreSight Debug Architecture of ARM processors.
  • In terms of On-board Communication peripherals. IC has 3 Low Power SPI, Low Power UART and FlexCAN peripheral, 1 Low Power I2C, one FlexIO module for emulation of on board communication protocols. Various and Different types of Automotive Sensors and modules can be connected along with this IC with rich support of Communication peripherals.
  • Automotive involves high secure and safety ECU nodes. Thus, IC has Cryptographic Service Engine (CSEc) implemented. It includes AES-128,CBC,ECB and CMAC. Pseudo and True Random Number Generators(PRNG,TRNG) with sequential, parallel and strict Boot Mode.
  • In addition TO CSEc, IC has Error Correction Code(ECC) and Cyclic Redundancy Check module, system memory protection units with Internal(WDOG) and external(EWM) Watchdog monitor.
  • For offloading the load on CPU while transferring data from memory regions of chip, IC has 16 channel DMA with 63 requests sources using DMAMUX.
  • IC also has Timing and Control module for capturing and outputting digital signals. It has 4 16 bit FlexTimers Module(FTM), 1 16 bit Low Power Timer Module(LPTMR),  1 32 bit Low Power Interrupt Timer(LPIT) and 1 32 bit Real time Clock(RTC).
  • IC comes only in LQFP packaging of 48,64 and 100 pins.

S32K144 MCU Block Diagram
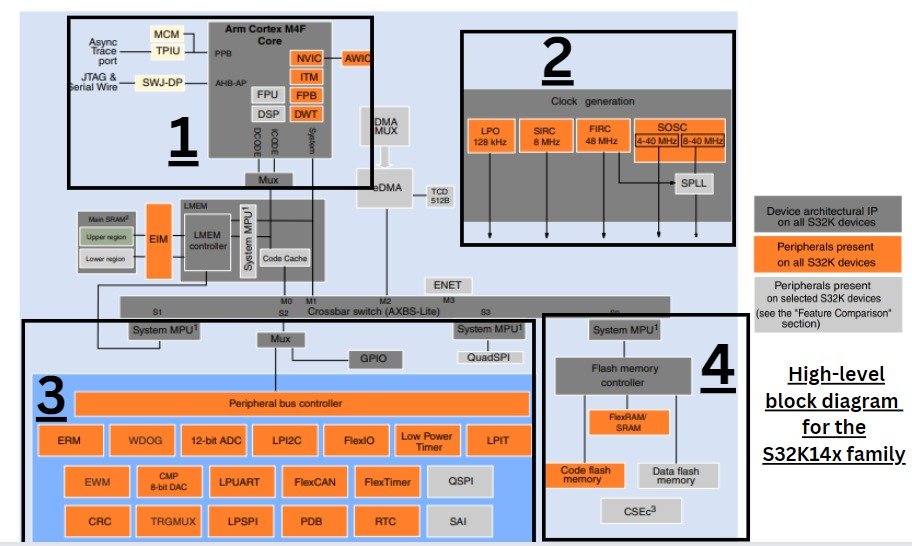
 

Above is the high-level architectural view of S32K144 MCU. As told in my previous blogs, one can consider Microcontrollers as human body, in which there is one human brain and all other body parts are connected to it, to interact with outside world. In the case of Microcontrollers brain is processor and peripherals connected to processor are body parts. 

  • The first block in above diagram is ARM cortex M4F Processor, which is most important unit of MCU. It has additional features integrated in it like that of NVIC,DSP, Debug and etc. as one can see in the block diagram.
  • Second block is clock generation. As digital systems need to run at some frequency that is provided by clock peripheral. So this block takes care of generating clocks for various sub-units of MCU by having different clocks as shown in block diagram.
  • Third block is the analogous to body parts of human body that interact with outside world. Here 3rd part comprises of wide number of on chip peripherals, which are connected to external sensors or modules to have interaction with external world.
  • Fourth block is the memory block, which comprises of flash memory, SRAM and memory protection features.
  • These are the main 4 blocks which covers majority of IC features, but in addition to it there are also small blocks like DMA, CSEc and etc. which would be further discussed in upcoming blogs.

S32K144 Hardware Development Kit(HDK)
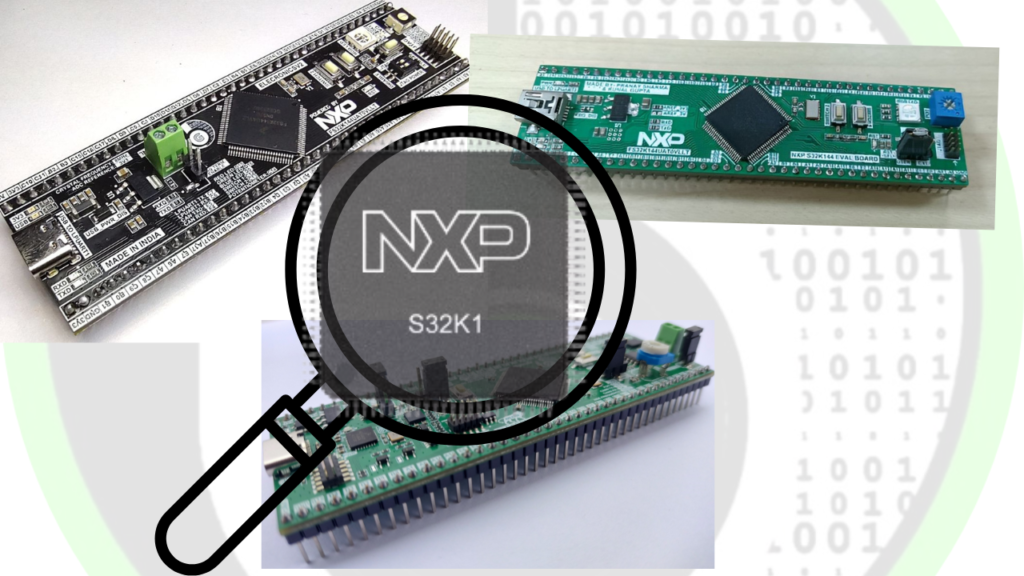
ElecronicsV Series: Arduino of Automotive World

ElecronicsV is a Automotive Development Board Series, supporting various automotive technologies like: Autosar MCAL layer, Matlab Model Base Designing, Vehicle communication protocols like” CAN, LIN, JN5189, Hardware Security Module based on SHE standard for providing safety/security support and advance motor control application for mobility applications.

These Development boards are built on automotive microcontroller S32K144 which are based on ARM Cortex M4 Processor and has various on-board features to enable the hassle-free development and learning of automotive technologies.

There are in total 3 versions in ElecronicsV series:

  1. ElecronicsV1: Breadboard Compatible Development board based on S32K144 MCU with basic on-board features of RGB LED’s, Switches,  Potentiometer and UART. This Board is obsoleted now. It was launched in July 2023.
  2. ElecronicsV2: Breadboard Compatible Development board based on S32K144 MCU with on-board features of RGB LEDs, Switches, Potentiometer, UART over Type C Cable and CAN transceiver IC making ElecronicsV2 self-sufficient CAN Node. This Board is also obsoleted now. It was launched in September 2023.
  3. ElecronicsV3: Breadboard Compatible Development Board based on S32K144 MCU with on-board features of: RGB LEDs, Switches, Potentiometer, BNO055 IMU Sensor, On-Board Jlink Debugger via Type C cable, CAN FD transceiver IC making ElecronicsV3 self-sufficient CAN Node and Virtual UART COM Port. This board is latest product and available in stock. It was launched in June 2024.

For buying the ElecronicsV3 board: S32K144 Elecronics V3 with onboard J-Link, BNO055 and CAN – Electronics Infra

ElecronicsV3 board is great amount of value of money at 6,000 INR. At just 6,000 INR, one can learn and get exposure to automotive technologies which are highly valued in the industry and great in demand. As usually other automotive hardware kits supporting all these technologies comes at heavy and heft prices of about more then 15-20K. Also, For ElecronicsV3, a full getting started and in-depth resources are they’re at: ElecronicsV(S32K144 MCU) – Get To Byte

Elecronicsv3 Board Pin Out
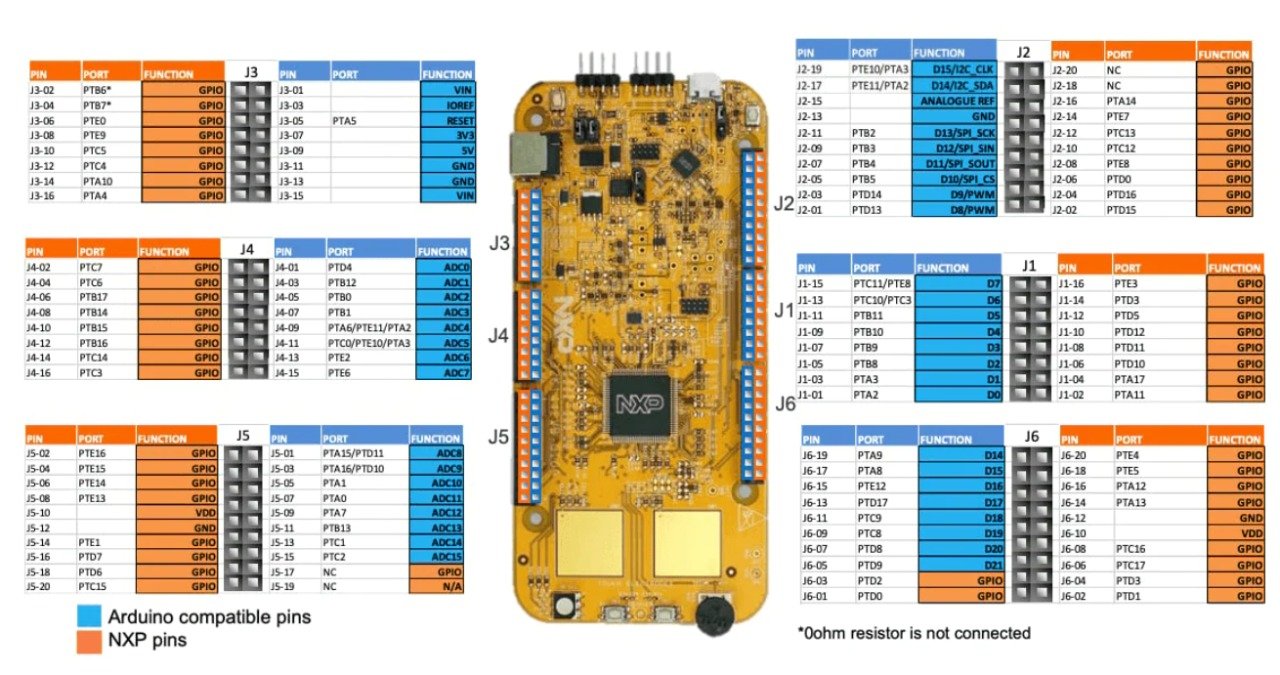
 
PINOUT of NXP S32K144 Evaluation Board

Above is the pinout of Evaluation board. We can easily connect sensor and modules via Jumper wires. Also the board has Arduino uno compatible expansion shield support.

  1. The board has on-board Mini High speed CAN Transceiver and System Basis Chip: UJA1169TK.( CAN_TX –> PTE5&CAN_RX –> PTE4).
  2. Single and multichannel LIN transceivers: TJA1027( LIN_TX–> PTD7 & LIN_RX -> PTD6).
  3. 2x touchpads(PTC3&PTC0), 1x Potientiometer(PTC14), 1x RGB LEDS( RED: PTD15, Blue: PTD0 and Green: PTD16) and 2x push buttons.

Debuggers

For Programming ElecronicsV series of Board, one can debug via Segger Jlink Debuggers or Even PEMicro Debugger via SWD protocol which is accessed via on-board 10 pin Debug connector pins.

ElecronicsV1 and ElecronicsV2 doesn’t have on-board Jlink Debuggers, for those board we will be needing external Jlink Debuggers for programming and debugging the S32K144 Microcontroller. Those who are interested in getting Jlink Debuggers for NXP S32 Family of MCU, can have a look at our ProBug Debugger. Which is Jlink debugger indigenously developed by Gettobyte.

ElecronicsV3 has onboard Jlink debugger and that too with virtual UART COM part, which makes it very easy and cost-effective enablement on automotive technologies. User just need to connect USB Type C cable from the ElecronicsV3 board to Host PC/Desktop. And now you are good to go. Doesn’t need anything else.

S32K144 Software Development Kit

IDE(Integrated Development Environment)

NXP provides the Integrated Development Environment especially for S32 platform products, S32 Design Studio which is built on Eclipse IDE.  S32 Design studio is based on open-source GNU Compiler collection (GCC) and also has GNU debugger (GDB).
S32 Design Studio Home page

One can easily download the S32 design studio from NXP website after logging in from here.

S32 Design Studio also provides various features for debugging and flashing the firmware. In addition to that we can add various extensions and install SDK packages of S32 platform directly from S32 design Studio.

S32 Design Studio is the Integrated Development Environment (IDE) which is used for writing, building and debugging the code to run on S32K144 MCU. S32 DS has many inbuilt features for debugging and analyzing the code, for efficient and fast implementation. Steps to install S32 Design studio are pretty straight forward and can be referred from here. Am skipping that part as that is pretty well documented on NXP Website and directly moving to GPIO Peripheral specific API’s and Files.

SDK(Software Development Packages)

NXP also provides built-in Software packages for fast development of applications: S32 Software Development Kit for S32K1. The SDK includes: Real Time Drivers, FreeRTOS support, Ethernet Stack, NXP motor control Libraries and etc. The SDK support 5 compilers for compilation: GCC, GreenHills(GHS), ARM Compiler, IAR and WindRiver DIAB.
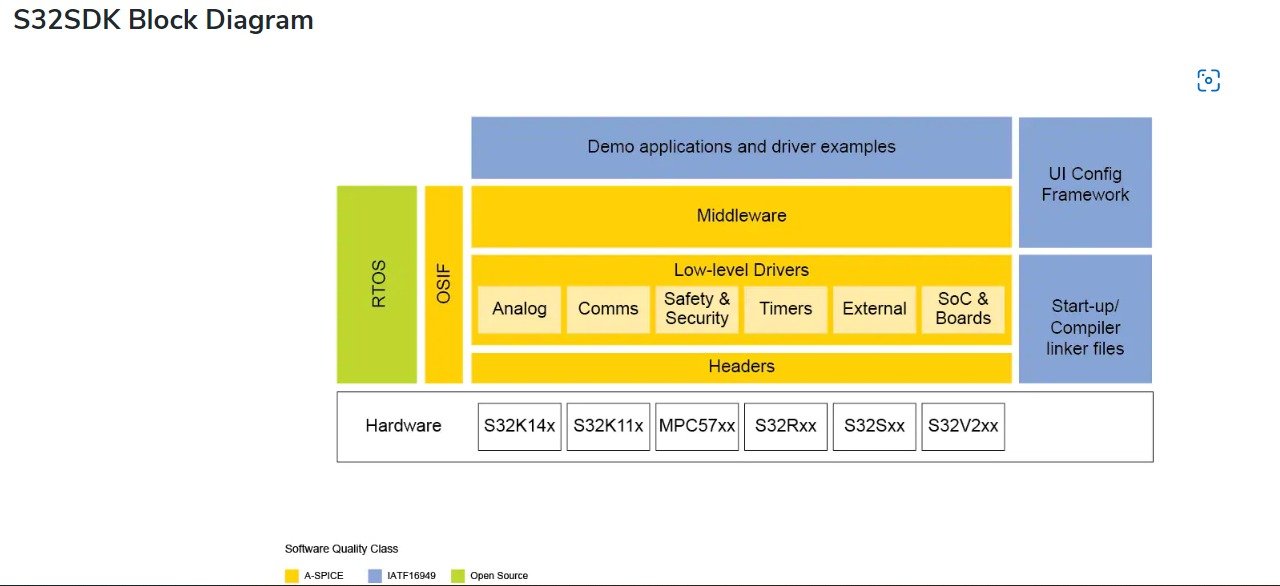
Now there are 2 SDK’s, which are provided for S32K144 MCU by NXP Semiconductors.

One is Autosar 4.4.0 complaint, in which all the peripheral drivers and RTD’s of the MCU peripherals are build based on Autosar classic standard. For the sake of refernce thorughout the series i will be naming this SDK as Autosar Complaint Drivers for S32K. Naming convention of these are like this: SW32K1_RTD_4_4_1_0_0_D2108

And other is generic one, based on MISRA C guidelines and Standards in which all the peripheral drivers, RTD’s and other software stacks (FreeRTOS and middleware: TCP/IP) are built on easy-to-use architecture, with less abstraction layers and complexities as compared to Autosar based for easy to use. Would be naming this as S32K Software Development Kit (S32 SDK). It boast an impressive array of features, including a comprehensive suite of robust hardware abstraction layers, peripheral drivers, RTOS, stacks, and middleware. These tools are specifically designed to simplify and accelerate the application development process, making it easier for developers to create high-quality applications with ease. Naming convention for these are like: S32_SDK_S32K1xx_RTM_4.02


S32K SDK

We will be using SDK based on MISRA C guidelines and standards, the S32K Software Development Kit at first: S32SDK_S32K1xx_RTM_4.0.2.

S32K Software Development Kit (S32 SDK) boasts an impressive array of features, including a comprehensive suite of robust hardware abstraction layers (HAL), peripheral drivers, RTOS, stacks, and middleware. These tools are specifically designed to simplify and accelerate the application development process, making it easier for developers to create high-quality applications with ease

As This SDK can also be downloaded easily from website. Am skipping the part of its installation part, in case of any Douts do reach out to me.

S32K Software Development Kit consists of several key components that can be used for Application development. When we download the package of S32K SDK, one will see following folder structure:
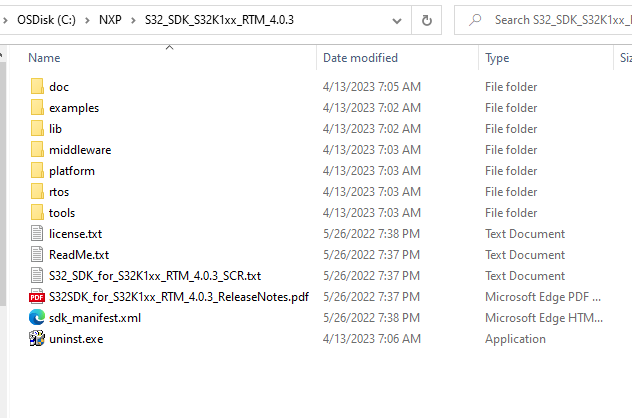
//just some overview on what each folder does!

We will be initially focusing on Hardware Abstraction Layer and peripheral drivers. For that folder platform is key component. Under the Platform, their are 3 folders as shown below:
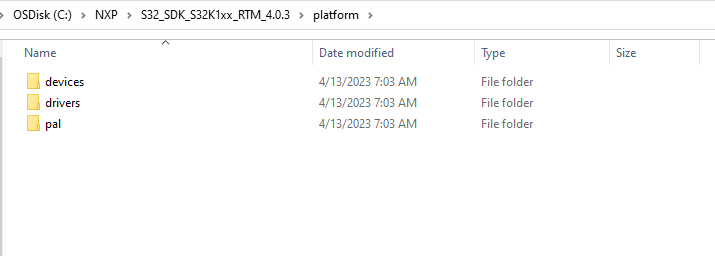
  • devices folder: contains the controller specific register header files, core specific register header files, controller specific feature configuration file, linker scripts and startup codes for different S32K MCU’s.
  • drivers folder: this contains the low level drivers for the peripherals of the MCU. Depending on the configurations done, low level drivers would be implemented.
  • pal folder: this contains the Peripheral Abstraction Layer for providing the unified interface for families of peripheral, allowing for cross -platform compatibility of application code.

As we are using S32K144 MCU, so we will find 2 files in devices folder: S32K144.h & S32K144_features.h files.

These are kind of configuration files, peripheral register address files and enables/disables the features that are to be supported in S32K144 MCU. These 2 files are one of the key files and would be used time to time.

				
					/*
** ###################################################################
**     Processor:           S32K144
**     Reference manual:    S32K1XX RM Rev.13
**     Version:             rev. 4.4, 2021-04-26
**     Build:               b210426
**
**     Abstract:
**         Peripheral Access Layer for S32K144
**
**     Copyright 1997-2016 Freescale Semiconductor, Inc.
**     Copyright 2016-2021 NXP
**
**     NXP Confidential. This software is owned or controlled by NXP and may only be
**     used strictly in accordance with the applicable license terms. By expressly
**     accepting such terms or by downloading, installing, activating and/or otherwise
**     using the software, you are agreeing that you have read, and that you agree to
**     comply with and are bound by, such license terms. If you do not agree to be
**     bound by the applicable license terms, then you may not retain, install,
**     activate or otherwise use the software. The production use license in
**     Section 2.3 is expressly granted for this software.
**
**     http:                 www.nxp.com
**     mail:                 support@nxp.com
**
** ###################################################################
*/
/*!
 * @file S32K144.h
 * @version 4.4
 * @date 2021-04-26
 * @brief Peripheral Access Layer for S32K144
 *
 * This file contains register definitions and macros for easy access to their
 * bit fields.
 *
 * This file assumes LITTLE endian system.
 */


					/*
 * Copyright (c) 2015 Freescale Semiconductor, Inc.
 * Copyright 2016-2020 NXP
 * All rights reserved.
 *
 * NXP Confidential. This software is owned or controlled by NXP and may only be
 * used strictly in accordance with the applicable license terms. By expressly
 * accepting such terms or by downloading, installing, activating and/or otherwise
 * using the software, you are agreeing that you have read, and that you agree to
 * comply with and are bound by, such license terms. If you do not agree to be
 * bound by the applicable license terms, then you may not retain, install,
 * activate or otherwise use the software. The production use license in
 * Section 2.3 is expressly granted for this software.
 */

/*!
 * @file S32K144_features.h
 * @brief Chip specific module features
 *
 * @page misra_violations MISRA-C:2012 violations
 *
 */


Run Time Debugging Tool: FreeMaster

FreeMaster Run-Time debugging tool

 FreeMaster Run-Time debugging tool

NXP Also provides the FreeMaster tool for run-time debugging. We will get onto this in upcoming blog, for the time being we are going to start with S32 Design Studio and S32K1 SDK.

Getting Started

 Getting Started with S32K144 Evaluation Board

We will get started with NXP S32K144 EVB board by running the Hello world program. In Microcontroller world Hello World example is Blink LED project. But before that we need above mentioned IDE and SDK for setting up the environment of S32K144 to do cross compilation in our Desktop/Laptop.

Refer this link: Get Started with the S32K144EVB | NXP Semiconductors for IDE, SDK installation and building Hello World program on S32K144 Evaluation board. Starting from the next blog we are going to develop application projects by interfacing different sensors and modules.

Further blogs to read
ADC in AVR

Table of Contents Introduction to Analog To Digital Conversion (ADC) Microcontrollers as we know of today are digital devices that is they only understand digital signals but our world is not digital and produces many analog signals as well. Here comes the role of ADC. Analog to Digital converter as the name suggests is used to convert any analog signal to digital so that microcontroller can read that signal. AVR microcontroller have inbuilt ADC on all bits of PORTA. In this blog we will be discussing about all the registers and bits necessary to use ADC on AVR. ADC on AVR Now let us use this ADC of AVR and convert analog signals to digital and read them. Block Diagram for using ADC on AVR: Let us discuss these steps in detail to understand use of ADC in AVR STEP – I : Basic Setup 1) Setting up pre-scalar for ADC frequency We know that digital signal are at fixed moment or instances of time while analog are continuous in time. So when we convert analog signal to digital signal we need to decide that on how many instances of time we need to take value of signal so that we can create a digital counterpart of signal. In the image above the green line depicts analog signal and blue lines make up digital signal. Now we need to decide that for ADC how many blue lines we need. The no. of blue lines in a second is called sampling frequency. AVR has a counter which counts from 0 till 65536 and turns back to 0 and counts again. We will tell AVR that every time you count 16 times then put 1 blue line of digital signal according to analog signal. This thing is known as pre-scalar. If we set up a pre-scalar of 8 means we say to AVR that after every 8 times you count add 1 reading of digital signal. Preferred and generally used pre-scalar value is 16. ADCSRA i.e. ADC Control and Status Register A has bits 2,1,0 which decide the prescalar for ADC. You can refer table below which is taken from datasheet to select value for ADC pre-scalar: Lets see code for setting 16 bit pre-scalar. For 16 bit pre-scalar we need to only set bit ADPS2, so we will set 1 to ADPS2 bit in ADCSRA register. ADCSRA |= (1<<ADPS2); 2) Setting up resolution for ADC Resolution is nothing but a technical term for maximum value that we will be taking up as digital value. As we convert analog signal to digital we convert it to numbers where a number will represent the maximum analog input value i.e. if we set max input to 5v then digital value of all inputs equal to greater than 5v will be that number. Similarly a number is assigned to minimum value and the range between those numbers represent the values between minimum to maximum input voltage set. Now 8bit resolution means 0-255. The question comes up how? It has a simple answers. 8 bit resolution means that the converted value will have 8 binary digits. So now minimum value of 8 digit binary number is 00000000 which is 0 in decimal and highest value is 11111111 which is 255 in decimal hence the 8 bit range is 0 – 255. Here 255 represent 5V (Maximum voltage input) and 0 represents 0V. This makes up 256 digits for 0 volt hence we can calculate: 5V/256 = 0.0195V This implies that every number represents 0.0195 V. So 1 in digital value is equal to 1*0.0195V = 0.0195V. Similarly 25 means 25*0.0195V = 0.4875 V and so on… Similarly 10 bit has 10 digits so range becomes from 0(0000000000) – 1023(1111111111). And now if we select maximum output voltage to be 5V then 1023 means 5V but for every count precision increases, so: 5V/1024 = 0.00488V Hence every count represent 0.00488V and as shown above now 25 count will mean 25*0.00488 = 0.122V. Enough theory!!! Now lets see how to write code and select the resolution (range) we need for our ADC. AVR has a 10bit ADC. We can obtain both 8 bit values and 10 bit values from ADC for AVR. To set resolution we need to use ADMUX register of our microcontroller. ADMUX stand for ADC Multiplexer selection register. For 8 bit mode, set ADLAR bit of ADC to 1. ADMUX |= (1<<ADLAR); For 10 bit mode, clear ADLAR bit i.e. make it 0. ADMUX &= ~(1<<ADLAR); 3) Setting up ADC reference voltage Reference voltage is the voltage level which will be considered as maximum voltage by our ADC and at any voltage level equal to or greater than reference voltage, we will get the maximum value after conversion. The maximum value that we discussed above is same ad known as reference voltage as ADC takes this voltage as reference to work. Reference voltage can be set using ADMUX register. Bit 7 and bit 6 decide the reference that we are going to use according to the following table fetched from the datasheet. a) AREF(00) – We give the reference voltage to AREF pin, i.e. PIN 32. b) AVCC(01) – The reference voltage is considered as power connected to VCC. AVCC is Analog VCC which is optional to give for better ADC functionality. If you leave it empty then also nothing happens. It also suggest to add an external capacitor between AREF and GND so that there is no noise in ADC due to AREF pin. c) Internal 2.56V(11) – This provides a fixed internal reference voltage of 2.56V to ADC. It also has suggestion of adding a capacitor in similar way as above so that there is no noise from AREF Pin. For AREF mode, clear REFS0 and REFS1 i.e. make them both 0 ADMUX &= ~(1<<REFS0); ADMUX &= ~(1<<REFS1); For AVCC mode, set REFS0 ADMUX |= (1<<REFS0); For Internal 2.56V, set both REFS0 and REFS1 i.e. make them both 1 ADMUX |= (1<<REFS0);

Read More »
Clock Peripheral in STM32F103

Clock Peripheral Theory Before getting into how to configure the clock peripheral . We will discuss why microcontrollers need a clock source at all. The processor , the busses and the peripherals that are present in the microcontroller all are reliant on the clock to synchronize their operations. The choice of the clock source depends upon the following factors:- How much speed is required for a particular application How accurate the clock source should be i.e the consistency of the period between each clock tick Power requirements of the application If there is any significant error in the clock speed it will cause unpredictable consequences for internal microcontroller operations.The operations such as:- The conversion rate of analog to digital signals is governed by a microcontroller clock . The clock determines the rate at which the analog signal will be sampled and how accurate that sampling is done is also governed by the accuracy of the clock. The digital to analog conversion in a microcontroller is also dependent on the clock as the clock speed determines the maximum frequency that can be generated for the analog signal. Also the clock accuracy determines the waveform accuracy In the case of asynchronous communication the sampling of the incoming data stream is clock dependent as well.Even though in some cases the synchronization of the clock is not necessary but the transmitter and receiver should have the same clock speed for decoding and encoding purposes. So in a nutshell the clock determines how fast a microprocessor executes the given set of instructions Clock Peipheral features in STM32F103 The main system clock of the microcontroller is the one from which all the other clocks are derived such as clock to AHB domain, clock to APB domain , clock to the USB, clock to the ethernet etc .  This main system clock is referred to as the SYSCLK. As can be seen in the picture of the clock configuration setting the system clock after being chosen is passed through prescalers  it gets divided into a clock source that goes into HCLK that goes into  AHB bus , DMA , cortex system timer ,FCLK. PCLK1 that goes into  APB1 peripherals and timer clocks .PCLK2 that goes into APB2 peripherals and timer clocks and ADC1. Hence it is responsible for operations such as DMA , ADC. These buses are further connected to the pins that are responsible for ADC , GPIO , SPI and other functionality and in case these pins are not being used the clocks to the pin can be disabled to save power                                                             FIG-1- Clock configuration in stm32cube To properly drive the SYSCLK there are 3 different sources:- HIGH SPEED INTERNAL (HSI) oscillator clock(Internal to MCU) HIGH SPEED EXTERNAL (HSE) oscillator clock(External to MCU) PHASE LOCKED LOOP(PLL) clock( Internal to MCU) There are secondary clock sources as well:- 40KHz low speed internal RC (LSI)  this used to drive watchdog and optionally RTC(Internal to MCU) 32.768 KHz low speed external crystal (LSE)  which drives the RTCclock (RTCCLK) the error involved the LSE is less compared to the LSI( External to MCU) By default the HSI is ON in the microcontroller whereas all the other clocks HSE, PLL etc are OFF. Each clock source can be switched ON or OFF independently when not in use to prevent unnecessary power consumption. HSI HSI is the default SYSCLK after startup from RESET state, wakeup from STOP OR STAND BY mode or failure of HSE. It is a low cost clock source having a start-up time less than HSE. The maximum frequency that can be generated is 8MHz using HSI. It suffers from the demerit that it is less accurate than external crystal oscillator or ceramic resonator Also as the temperature increases above 25 degree celsius the accuracy decreases HSE In case of high speed application HSE can be used as a clock source for SYSCLK . The HSE or the high speed external clock is an external clock that sometimes comes attached to the microcontroller itself or at times requires the usage of an external circuitry. HSE is faster and more accurate than HSI but suffers from demerits such as slower startup time, high power consumption and times usage of an external circuitry The maximum frequency that can be generated using HSE clock is 16MHz HSE  has 3 states ON , OFF and BYPASS BYPASS is basically  connecting wire to OSC_IN and putting the OSC_OUT in high impedance state i.e bypassing the crystal oscillator as can be seen in FIG-2 external source  FIG-2 BYPASS mode in HSE PLL The PLL or phase locked loop is a clock system that is capable of providing the clock frequency much higher than that of HSI or HSE i.e in case of stm32f1 series it can go up to 72Mhz Hence for high speed applications PLL is a go to choice . Also peripherals such as USB, Ethernet PHY can not work using HSI or HSE. PLL provides the flexibility of choosing clock frequency without the help of an external oscillator. SYSTICK clock  The SYSTICK is required to generate interrupts on a regular basis . It helps the OS in multitasking applications .In applications without an OS is used for timekeeping, time measurement or as an interrupt source. It is derived from the system clock in stm32 and has an usual value of 16MHz. Which means is to generate a delay of 1sec 16000000 has to be loaded on SysTick load value register Clock peripheral HDK in STM32F103 external oscillator pins MCO pins Clock peripheral SDK in STm32F103 Clock peipheral Files in STM32HAL: CLock peripheral low level files and HAL level files Fucntions descritption and structure decsritption Clock Peripheral HAL Functions HAL_RCC_OscConfig: return type HAL_RCC_OscConfig(RCC_OscInitTypeDef *RCC_OscInitStruct) Parameter arguments explanation and return type explanantion Argument 1 Argument 2 argument 3 return type //Demo of how to use functions Clock Peripheral HAL Data Types Data type name( structure name): //Code of that structure Tab #1 Tab #2 Tab #1 Lorem ipsum dolor sit amet, consectetur

Read More »
Implementation of BLE on STM32WB55

Table of Contents About GPIO Peripheral The pins which can be configured by the software at runtime to perform various functions are called GENERAL-PURPOSE INPUT/OUTPUT (GPIO) pins. With the help of software one can program the GPIO pins mainly as: Digital Output It compares the external voltage signal with a predefined threshold. Digital Input It controls the Voltage of the pin  Analog Function  It performs ADC (Analog to Digital Conversion) or DAC (Digital to Analog Conversion) Other Functions or Alternate Functions It makes the pin to perform other functions like PWM output, timer-based captures, external interrupts, and various other interfaces like SPI, I2C, UART communications. Before coming to the Schmitt Trigger Understanding, have a quick recap of Pull Up, Pull Down and Open Drain Configurations from MPU6050 Implementation blog Implementation of MPU6050 with STM32 – gettobyte GPIO Input: Schmitt Trigger GPIO Output Speed Slew Rate GPIO Input: Schmitt Trigger A SCHMITT TRIGGER is a device which uses a voltage comparator to convert a noisy or slow signal edge into a clean and desirable edge instantaneously.  For a real time system, the external signals do not change instantly, due to slower slew rate which depends on inheritance parasitic capacitance, resistance or an inductor at the  input side.  As the processor chip has a Schmitt Trigger, it increases the slew rate and increases the noise immunity for the signals which are captured. Let us understand the implementation of the Schmitt Trigger. It consists of a voltage comparator with positive feedback. The output Vout depends between two input voltage V+ and V–. If V+ > V–, Vout is quickly saturated to VSAT, otherwise Vout  = 0 For an ideal op-amp, the current flowing through resistor R3 is zero and thus we have Vref = V– The op-amp output Vout has two saturation values, as shown below Vout = VSAT if V– <V+       0 if V– < V+ However, V+ depends on Vout and Vin· Therefore, Vout depends on both the input Vin and the recent history of Vout· Such an effect is called hysteresis. Using KCL, assuming that the current flow in the non inverting input terminal of op-amp is zero, Vin – V+ /R2 = V+ – Vout / R1 On solving the above equation we will get, Vin = R2Vout + R1Vin / R1 + R2 At the time instant when Vout transits from one saturation value to the other saturation value, we have V+ = Vref Thus, Vref = R2Vout + R1Vin / R1 + R2 Solving further we get, Vin = (1 + R2/ R1)Vref – (R2/R1)Vout As discussed earlier, Vout has only two possible values. If Vout = 0 initially and Vin increases, we can obtain the trigger high threshold VTH at which Vout transits to VSAT: VTH = (1 + R2/R1) Vref – (R2/R1)*0 = (1 + R2/R1)Vref On the other hand, if Vout = VSAT initially and Vin decreases, we can obtain the trigger low threshold VTL at which Vout transits to 0: VTL = (1 + R2/R1) Vref – (R2/R1)VSAT Vout can be determined by comparing it with two thresholds VTH and VTL. When Vin climbs through VTH , Vout is rapidly switched to the upper limit VSAT· Conversely, once Vin falls below VTL, Vout makes a transition to the lower limit.  Note that VTH > VTL , i.e., the threshold for switching to high is greater than the threshold of switching to low. A Schmitt trigger when compared, Provide a better boise rejection. Larger threshold for switching high and low for switching. Immune to undesired noise. GPIO Output Speed Slew Rate The SLEW RATE of a GPIO pin is the speed of change of output voltage with respect to unit time. Slew Rate = ΔV/ Δt  In simple words, If the GPIO pin changes from LOGIC LEVEL 0 to LOGIC LEVEL 1, the voltage changes from 0V to 5V in just 5µs, then the slew rate is simply 1V/µs. The higher the slew rate, the shorter time the output voltage takes to rise or fall to desired values. Therefore, a higher slew rate allows faster speed at which the processor can toggle the logic level of a GPIO pin. A shorter rise and fall time allows a GPIO pin to change its logic value more rapidly. A high slew rate can result in significant electromagnetic interference (EMI), also known as radio frequency interference (RFI), to nearby electronic circuits. This is due to the large-amplitude and high-frequency harmonics produced by a fast-rising and falling signal, which can cause malfunctions in a victim circuit through radiation, conduction, or induction. To reduce EMI disturbance, a slower slew rate is generally preferred. GPIO IN STM32WB Each GPIO port has 4 32-bit Configuration Registers (GPIOx_MODER, GPIOx_OTYPER, GPIOx_OSPEEDR and GPIOx_PUPDR) 2 32-bit Data Register (GPIOx_IDR and GPIOx_ODR) A 32-bit Set/Reset Register (GPIOx_BSRR) A 32-bit locking Register (GPIOx_LCKR0 and 2 32-bit Alternate Function Select Register (GPIOX_AFHR and GPIOX_AFLR)   Main feature sog GPIO are Output states: push-pull or open drain + pull-up/down  Speed selection for each I/O Input states: floating, pull-up/down, analog  Fast toggle capable of changing every two clock cycles Highly flexible pin multiplexing allows the use of I/O pins as GPIOs or as one of several peripheral functions  GPIO Functional Description The port bit of GPIO can be configured by the software depending upon the hardware characteristics in various modes such as: Input floating  Input pull-up  Input-pull-down  Analog  Output open-drain with pull-up or pull-down capability  Output push-pull with pull-up or pull-down capability  Alternate function push-pull with pull-up or pull-down capability  Alternate function open-drain with pull-up or pull-down capability  Each I/O port bit is freely programmable, however the I/O port registers have to be accessed as 32-bit words, half-words or bytes. The purpose of the GPIOx_BSRR register is to allow atomic read/modify access to any of the GPIOx_ODR registers. In this way, there is no risk of an IRQ occurring between the read and the modify access. The above diagram shows the basic structure of a

Read More »
INTRODUCTION TO MPU6050IC

Most of us are fans of Video Games. We played a lot of games on our mobiles like PUBG, Call Of Duty and my personal favorite Asphalt. In all these games one thing we all notice is that as we rotate or bend our phone, the car also rotates in the same direction.  Have you ever imagined how this would happen? Well their are electronic sensors:  accelerometer and Gyroscope Lets dive into this blog, to know the Ans for this!!! What is an ACCELEROMETER WORKING Let us assume a small ball being placed in a box filled with vacuum and no external force is applied to it (i.e., consider the situation of outer space). Now initially the ball will be at the center of the box. Consider each side of the box as an axis. Suddenly we start moving the box to the left side  with the acceleration of ‘g’ (i.e., 9.8m/s2), the ball will hit the +X side of the box. Since no external force is acting on it, and the entire thing is weightless (vacuum state), hence the force comes out to be ‘g’. Consider another scenario when the box is moved upwards with the same acceleration ‘g’. Now again the ball will hit the downward side of the box i.e. +Z axis with the force equal to ‘g’. This is just a simple explanation on how an accelerometer works but in practical scenario accelerometers are based on MEMS technology built on a silicon wafer with companion CMOS electronics through wafer-level bonding. Taking the above situation in mind, there consists of a silicon wafer having polysilicon springs connected with a suspended plate covered with fixed mass around it on the wafer where in between the space, this fixed plate moves. This entire structure reflects the changes whenever acceleration is applied across the X,Y and Z axis. This reflection is reflected by the capacitance change placed in between the fixed masses as the suspended plate moves thus the sensor records this change in capacitance as the final reading. GYROSCOPE WORKING Since the accelerometer measures the linear acceleration, the gyroscope on the other hand measures the angular rotation which is accomplished by Coriolis Effect. Coriolis Effect The Coriolis Effect states that when a mass (m) moves in a specific direction with a velocity (v) and an external angular rate (Ω) is applied, the Coriolis Effect generates a force (F) that causes the mass to move perpendicularly. The value of this displacement is directly related to the angular rate applied. Consider two masses oscillating in opposite directions at a constant frequency. When an angular rate is applied, the Coriolis effect produced by each mass is in opposite directions, resulting in a proportional change in capacitance between the masses. By measuring this change in capacitance, the angular rate can be calculated. The MEMS sensor consists of a proof mass (i.e., it consists of 4 parts M1, M2, M3. M4) that continuously oscillates inward and outwards in the plane, thus causing a coriolis effect. When the structure is being rotated, the Coriolis Force acts on the moving mass causing oscillations in the plane. There are three modes depending upon the axis along which the angular rotation is applied: Roll Mode: When the angular rate is applied at the X-axis Pitch Mode: When the angular rate is applied at the Y-axis Yaw Mode: When the angular rate is applied at the Z-axis What is A MUST HAVE Motion Interfacing one finds in almost every smartphone and tablet. It is a 3-axis gyroscope and 3-axis accelerometer, in total an integrated 6-axis MotionTracking device all in a single small 4x4x0.9mm package. This package size has been achieved by the MEMS (MicroElectroMechanical System) innovation. Coming to some technical aspect of the IC, It comes with a dedicated I2C sensor bus at 400KHz Features 3 16-bit analog-to-digital converters (ADC) each for digitizing gyroscope and accelerometer outputs. Gyroscope full-scale range of 250,500,1000 and 2000 degree/sec (DPS). Accelerometer full-scale range of 2g,4g,8g,16g and On-chip 1024 Byte FIFO buffer which enables the system to read the sensor data in burst and then enter the low-power mode. Lastly, it operates at a power supply voltage range of 2.375V – 3.46V. Features of ACCELEROMETER in MPU6050IC Features of GYROSCOPE in MPU6050IC Features of ACCELEROMETER in MPU6050IC Features of Accelerometer in MPU6050IC The triple-axis MEMS accelerometer in MPU-60X0 includes a wide range of features:  Digital-output triple-axis accelerometer with a programmable full scale range of ±2g, ±4g, ±8g and ±16g Integrated 16-bit ADCs enable simultaneous sampling of accelerometers while requiring no external multiplexer Accelerometer normal operating current: 500µA  Low power accelerometer mode current: 10µA at 1.25Hz, 20µA at 5Hz, 60µA at 20Hz, 110µA at 40Hz Orientation detection and signaling  Tap detection User-programmable interrupts. Features of GYROSCOPE in MPU6050IC GYROSCOPE FEATURES The triple-axis MEMS gyroscope in the MPU-60X0 includes a wide range of features: Digital-output X-, Y-, and Z-Axis angular rate sensors (gyroscopes) with a user-programmable fullscale range of ±250, ±500, ±1000, and ±2000°/sec  External sync signal connected to the FSYNC pin supports image, video and GPS synchronization Integrated 16-bit ADCs enable simultaneous sampling of gyros Enhanced bias and sensitivity temperature stability reduces the need for user calibration Improved low-frequency noise performance Digitally programmable low-pass filter Gyroscope operating current: 3.6mA Standby current: 5µA  Factory calibrated sensitivity scale factor MPU6050 of MPU6050 Block Diagram of MPU6050 IC Gyroscope sensor Accelerometer sensor Digital Motion Processor (DMP) engine Primary I2C Auxiliary I2C Clock Generation Sensor Data Register FIFO Buffer Interrupts Digital Output Temperature Sensor Bias and LDO Charge Pump Gyroscope sensor Three-axis MEMS rate gyroscope sensor with 16-bit ADCs and signal conditioning It consists of three independent vibratory MEMS gyroscopes, which detect the rotation about the X, Y, Z axis. The capacitive change due to Coriolis Effect is observed whenever a rotation is caused about any of the axes. The corresponding signal is then amplified, demodulated and filtered to the corresponding voltage levels that relate to the angular rate. The sensor has an on chip 16 bit ADC to

Read More »
Kunal Gupta
Author: Kunal Gupta

Stay Updated With Us

Error: Contact form not found.

      Blog