Table of Contents
Communication Protocols in Embedded System
Serial communication
In serial communication, we have only one line for transmitting and receiving data which is why it is half-duplex. It is best for high frequencies as it uses only a single bus or channel for communication, but it can be a bit slower than parallel as it sends only a single bit per clock pulse also because of the single wire here we have fewer chances of cross-talks. It can detect the error as well.
When transferring a bit quick change in voltage are required like for 5v OS, 0 bit communicated as a short pulse is 0v, and 1 bit communicated by a short pulse of 5v. In serial communication, the first bit is the most significant bit and the last one is the least significant bit.
Parallel Communication
In parallel communication, we have a number of lines or buses equal to the number of bits we are transferring. We call it full duplex as the line for transmitting and receiving bits is different. It is faster for small frequencies as all bits are sent at once but as we have to use multiple wires it is costlier also here, we have lots of chances of cross-talks.
As in serial, here also we have the first bit is the most significant bit and the last one is the least significant bit.
How do they convert?
The protocols we have read above communicate in serial form, but they get the data from their peripheral device in parallel form. How do bits get converted into serial form to parallel form? Suppose we have 4 bits, to convert them from parallel to serial we need a Parallel to Serial converter, In the same way, if we want to convert parallel from series, we need a serial to parallel converter. Here comes the D Flip-Flop which is specially designed for such conversions.
What is Flip-Flop?
A basic memory element or basic digital memory circuit is known as Flip-Flop. It is some medium in which one bit of information (1 or 0) can be stored or retained until it\’s necessary.
- As one flip-flop can store one bit of information. To store multiple bits, we need multiple flip-flops.
- The group of flip-flops, which are used to store the binary data is known as register.
Flip flop circuits are classified into four types based on their use:
- D-Flip Flop
- T- Flip Flop
- SR- Flip Flop
- JK- Flip Flop.
Here for conversion between Serial and parallel bits of data D-Flip Flop is used.
Now, what is D Flip-Flop?
D flip-flop is also known as Data or Delay Flip-Flop. It has a single D input and a clock input C which is why we call it a D flip-flop. Or for the word delay, it describes what happens to the data at input 0. The data at D input is delayed by one clock pulse before it gets to the output Q.
There are two different ways of conversions:
- Parallel to Serial conversion.
- First, we need Flip-Flops equivalent to the number of bits. Then we will put the multiplexer in between the Flip-Flop.
Multiplexer- It is a combinational circuit that takes input from one of many input lines(parallel) and directs it to a single output line(serial).
It has two inputs:
1) From the previous Flip-Flop
2) From Parallel bit data.
Now we will load the data which will be transferred one by one.Here msb will be transferred first.
- Serial to Parallel conversion.
- First, we need Flip-Flops equivalent to the number of bits. This time we won\’t put the multiplexer in between the Flip-Flop.
- We need to store all the bits at first for this we will pull the clock signal low. Once all bits are loaded, we will pull the clock signal high, and it will shift the LSB to the input of Flip-Flop 1 and output of Flip-Flop 0. Same way all bits gets transferred.
- Now all the bits are stored in these Flip-Flop and as shown above all the Flip-Flop will transfer the bits at once the way it happens in parallel..
Overview about Serial Communication Protocols in MCU
UART Protocol
What is UART Protocol?
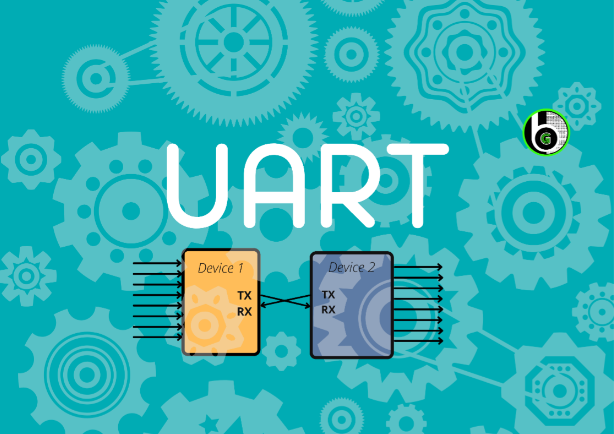
UART stands for Universal Asynchronous Receiver/Transmitter. As we can understand by the name it says it receives and transmits asynchronously. Asynchronously means it doesn\’t use clock pulse to synchronize the transmitter and the receiver.
In UART, the transmitter takes the signals in parallel from a controlling device[ex-CPU] then it sends the bits to a receiver in serial then the receiver converts those bits in parallel again. UART follows one master one slave approach as it uses only 2 wires for communication. It has one transmitter and one receiver.
How does it work?
As I, ve mentioned above it transmits asynchronously hence it uses a start and stops a bit, in it contains main data and a parity bit. The parity bit is only needed if the device needs to check the error.
When the device wants to start the communication, it pulls the transmitting line low which means it sends a 0 bit and receiving device understands that the transmitter wants to send the data. When the transmission line goes lows it stays low for one clock pulse and then it starts sending the data of 8 bits then the 9th one is a parity bit, the last one is stopping bit it stays high for the one clock pulse until the transmitter sends a low bit to start another frame.
To get, in detail understanding on UART Protocol, refer to this blog.
SPI Protocol
What SPI Protocol is?
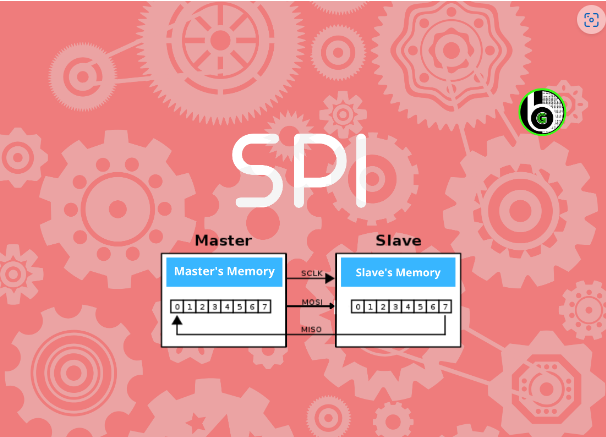
SPI stands for Serial Peripheral Interface. Just like UART it also uses Serial Communication for transmitting and receiving data but instead of asynchronous it uses synchronous communication protocol for transmission.
Synchronous means the transmitter and the receiver must have the same clock signal. It uses a Full duplex communication protocol which means it can send and receive at the same time. SPI follows one Master multiple slave configuration.
This protocol has 4 parts
1. MOSI-Master Out Slave In
Here Master sends data to the slave and the slave receives the data. Master sends data to each device it is connected to via a single wire.
2. MISO-Master In slave out
Here Slave sends the data to the master and the master receives the Data. Master receives the data from each device it is connected to through a single wire.
3. CLK-Clock Signal
It is important for synchronizing the data when the master sends or receives it.
4. CS/SS-Chip select/slave select
We have different wires connected to the chips. Suppose we have 3 chips connected. Then the master would have three wires cs1,cs2,cs3 connected from chip1, chip2,chip3 individually.
To get in detail understanding on SPI Protocol, refer this blog.
I2C Protocol
I2C stands for the inter-integrated circuit. If you have read carefully about SPI and UART you will find I2C got the best features of these two.
It follows multi-master protocol as multiple masters through a single slave or to multiple slaves. It is a half-duplex communication protocol since it has only one line for transferring and receiving data. It is also called Two Wired Interface as it uses two wires for communication.
This protocol has 2 parts
- SDA: For sending bits
- SCL: For synchronizing the data.
How does it work?
In I2C as we have multiple slaves, every slave must have a different address before sending a bit master will address or call the receiver. If we have multiple masters then the master will check the clock signal. If it is high it will send the data or if it is low then it means another master is sending the data at the moment.
To get more in detail understanding of I2C protocol, refer to this blog.
Conclusion Para
- In the end, if you want to use two devices then UART works best and fastest.
- If you have multiple slaves and one master then I would suggest going for SPI
- And if you want to connect one slave with multiple masters then I2C is the fastest as it lowers the wirings as well.
Other blogs to explore
About Microcontrollers
About IoT
How to Use Trace Features in STM32 with STLINKv2 in CubeIDE
Table of Contents Overview Okay so hello guys and hope u are doing great; in the last 2 Blogs we get to know about Debug Trace Features in Embedded Systems and about ARM CoreSight Architecture for Debug and Trace in ARM based SoC/MCU. Now, in this Blog we will implement the theoretical knowledge of previous blogs to action and do them practically! We will do so by exploring the Trace Features in STM32MCU practically (STM32F103 Blue pill) using STLINKv2-B ( Official one white one) in STM32CubeIDE.  This Topic has been divided into 2 Blogs. In this Blog Hardware connections between STLINKv2-STM32MCU and Code Generation is explained. The Video For that is also Uploaded on Gettobyte YouTube channel here. In next Blog How to use Trace Features using SWV is explained. The Video for that too is Uploaded on Gettobyte YouTube Channel here. Intro on STLINKv2 Programmers and Debuggers Now STLINKv2 which you can see in the above image is different from USB based STLINKv2 Programmer and debugger( Chinese clone one). It is different in terms of more features and JTAG support for Debugging the Firmware’s. Original STLINKv2 can be used for Programming and Debugging Both STM8 and STM32 MCU. For STM8 it uses SWIM Protocol and for STM32 it has SWD, JTAG Communication Protocol and SWO pin for trace features. In USB based STLINKv2 Programmer Chinese cloned one also both STM8 and STM32 MCU can be programmed and debugged. For STM8 it also uses SWI Protocol but for STM32 MCU it has only SWD Protocol and pins available. For using the trace features, In USB based Chinese cloned one STLINKv2 (which is relatively cheaper than above STLINKv2) we must solder the 5V pin of Programmer by one of the pins of the onboard pin of the MCU used in Programmer. And it is a kind of long and Cumbersome Process. But in Official STLINKv2 which is shown in above pic, we do not have to solder any of the pins for using Trace Features, The Programmer has Pinout and dedicated pins for using Trace feature using (SWD + SWO pins) and it has JTAG Dedicated pins too for Doing Debugging . Now as given u some comparisons between Official and Unofficial STLINKv2 Programmer and Debugger let us dive into some Practical Part. In the rest of the doc, STLINKv2 programmer and Debugger will signify the Official white in one derivative which is shown in above pic. Hardware Connections for STLINKv2 and MCU The STLINKv2 Programmer comes in with following things as u open its Box. Main STLINKv2 Programmer and Debugger 20 Pin JTAG connector USB 2.0 A to USB 2.0 Mini B 2 x Connecting Cable for STM8 SWIM Now coming to the pain Connections for connecting STM32 MCU with STLINKv2.Programmer has the following pins for connecting it to STM32 MCU(Blue Circle). These Pins have Pinout like these: Right side from the Embarked Area (Orange Color), is pin 1 of the Programmer and then the pinout goes as shown in above pic. Now the Essential Pins out of these 20 pins of the STLINKv2 programmer to Program and Debug STM32 MCU using ARM Proprietary SWD Protocol are only 5 pins. SWIO/TMS(Pin 7) à SWD PIN SWCLK/TCK(Pin 9) à SWD PIN TDO/SWO(Pin 13) à SWO PIN STM32 RESET(Pin 15) à RESET PIN VCC(Pin1&2) à POWER PIN GND(Below Horizontal line’s any pin can be used as GND except 2) à POWER PIN SWD Pins of STM32 MCU will be connected to SWD PIN if we want to only use Debugging features alongside Programming the Microcontroller. Like as shown in PIC.  Now for Using the Trace Features we must connect one additional Pin from the Programmer to OUR Microcontroller and that is SWO Pin (13th pin) of Programmer to the Respective Trace SWO Pin Of our STM32 Microcontroller. In STM32F103 SWO PIN is PB3 as shown in this schematic. So, for Using Trace Features Connections will be like this. To be noted down: Any pin from the below horizontal line except the VCC pin of that line can be taken as GND pin when using SWD/SWD+SWO pins and can be connected to GND pin of our STM32 MCU. Sometimes or in some Programmers we have to short all the VCC pins by Jumper wire for Proper connections or encase device isn’t able to power up MCU or Program it. In some cases, VCC pins 1&2 can be wrongly mapped in Some Programmer, and they can be at left hand side of the programmer that is at pins 19 and 20. So in case MCU does not Power up by above connections, then do not panic just change the VCC Pins and it might work out. ( This is in my case, so below pitcher is according to that) Now so after successful Connections between STLINKv2 and STM32 MCU, Connect the USB cable between STLINKv2 and Laptop and LED light on the programmer will lighten up in RED color. Figure 5 (These are the Final Connections For SWD+SWO) Software Part used Now I will be Showing STM32CubeProgrammer and STM32Cube IDE In this blog in software part. First with STM32CubeProgarmmer: As u connect your STLINKv2 Programmer to your computer, IN STM32CubeProgrammer u will see the Serial Number of Programmer if all goes well. As shown in Pic. Figure 6 Now as u click on Connect Button by selecting STLINK, u will see all the details of Your respective MCU details and showing its memory Content. (In doing so Your programmer will start blinking in red, green color and Screen of STM32CubeProgrammer might take 1-2 secs of time for showing Memory contents and MCU details.) Figure 7 This is just Demonstration of Successful connections of STLINKv2 and MCU for SWO+SWO pins and established Communication between Programmer and Laptop via STM32Cube Programmer. As if now, we have not used the trace features, for using that we must create a project and Upload in MCU by things mentioned in below section. For
GPIO Peripheral in S32K144
Explore About GPIO Peripheral in NXP S32K144 MCU || What is it?? How to use it??
What are NXP Semiconductors S32K Automotive Microcontrollers || Why to get started with them and how?
Add Your Heading Text Here Author: Kunal Gupta
Introduction of Nordiac NRF5xx SoC\’s
Table of Contents Overview on Nordic IoT Chips Nordic Semiconductor is a semiconductor MNC, which designs & develops a wide range of SoCs supporting IoT protocols. These SoC’s have all functionalities of Microcontroller(MCU) based on ARM cortex Processors, plus they embed 2.4ghz RF transceivers into the chips using RF-CMOS technology for making IoT chips. NRF52 and NRF51 series of SoC’s are widely accepted across the industries where there is a need for Low Power/Ultra Low Power consumption IoT solutions. Nordic Semiconductor NRF5xxx SoC is ideal for Ultralow power and cost-effective short-range wireless solutions. Typical applications for NRF5xxx SoC are: IoT(Internet of Things) devices Wearables Smart Home Wireless Mobile Phone Accessories PC Peripherals Beacons Bluetooth-enabled consumers NRF51 & NRF52 Series have all hardware support of MCU peripherals like ADC, SPI, I2C, UART, GPIO, TIMERS, etc, and 2.4ghz RF transceivers for hardware support of IoT protocols into the chip. Thus NRF5xxx series of SoC can be used for Embedded devices applications(Using MCU peripherals like UART, SPI, I2C, TIMERS, ADC, RTC, USB, etc.)and IoT applications( using protocols like BLE, ZigBee, Thread, ANT, etc.) simultaneously. NRF5x Series supports the following short-range IoT protocols: BLE THREAD ZigBee ANT Near Field Communication NRF Proprietary IoT protocols: ESBP & Gazell. Nordic Semiconductor also provides a full suite of IoT stacks to support of above IoT protocols. Nordic Semiconductor has named them Softdevices. To get to know about IoT protocols supported by Nordic chips you can refer to this. Nordic Semiconductor provides a wide range of development hardware from development kits to USB dongles for fast prototyping and hobbyists to play with NRF5x IoT Soc. How to get started?? We will be using Nordic NRF52840 – DK, which is the official development board for the NRF52840 SoC. Now when I first got the NF52840 DK, it is very different from Arduino, STM, ESP boards. It has lots and lots of chips on it and quite fascinating to explore what all hardware is on it for what purposes. nRF52840-Development Kit At the same time, it is very confusing for me also on how to start with these IoT chips as they have so many features and functionalities on them. From MCU peripherals to IoT stacks, Crypto engines, Power management, analog features, and many more. nRF52 and nRF51 Chips So what I decided at first will start from exploring MCU peripherals, understanding peripheral driver header, and source files: HAL & LL. Subsequently will get to know about the Development environment and SDK of NRF chips. Starting from basics at first and then will move to IoT protocols, in that also we will first start from BLE and then to other IoT protocols. Those who don’t want to explore NRF52840 MCU peripherals can directly start from the BLE part of NRF5x chips. At first, we will make some application code using NRF5x MCU peripherals like GPIO, UART, SPI, I2C, TIMERS and etc. Will understand the HAL APIs provided by Nordic SDK for these peripherals. Will then interface different sensors and modules for making embedded devices. Then will understand the supported IoT protocols architecture and stacks. Now to get started with any MCU or SoC the first couple of things we have to understand are: Its Development Software: Software Development KIT(SDK), Integrated Development Environment (IDE), Debuggers, Environment setup for cross-compilation from our laptop/desktop to the designated MCU processor. Then we have to gather & understand the development board of the corresponding semiconductor chip. As development boards are the fastest and easiest way to get started with semiconductor chips. We will be using NRF52840- Development Board in this series and all the blogs and videos will be on it only. Development Software for Nordic SoC’s Toolchain setup for Nordic SoC’s At first, we need an IDE. IDE provides a complete solution and one-stop environment for firmware development on microcontrollers. So Nordic Semiconductor provides 2 IDE for the development: Seger Embedded Studio and Arm® Keil µVision. The one which is recommended and preferred to use is Seger Embedded Studio (SES). So, in this tutorial series, we are going to use Seger Embedded Studio (SES). SES is a professional IDE that is highly recommended and used in the industry. SES is free to use for Nordic chips and its installation is pretty easy, can be downloaded from this link. Seger Embedded Studio Nordic chips are programmed and debugged using J-Links. Nordic NRF52840-DK has an onboard Jlink debugger and programmer. So we don’t have to care much about the hardware side of the debugger, but we have to install some software packs for using the Onboard J-Link debugger. We will install the Segger J-link Software and save it along with the same directory as that of SES. So that all that we have to set up for the toolchain of Nordic Chips, successfully installed the IDE and Debugger pack for Developing for Firmware on Nordic chips. At first, when we open the Segger Embedded Studio, it will open with a Hello world example as shown below. Segger Embedded Studio first time open page. How to get started with Seger Embedded Studio for NRF52840 nRF5 Series: Developing with SEGGER Embedded Studio (nordicsemi.com) Software Development Kit for Nordic SoC’s Once we have set up the toolchain, we will now explore and understand the SDK provided by Nordic. SDK includes the building blocks for developing applications. This includes the framework, peripheral libraries, Source & Header files of drivers, RF stacks, example codes for various applications, bootloaders and etc. Every MCU vendor provides the SDK, which is written in C/C++ languages to get started. One will write the source code in SES IDE using SDK provided by Nordic. Now as we navigate to the Nordic Semiconductor website under the Development Software Section, we will see there are a number of SDK packs which are listed: nRF 5 SDK nRF SDK for Mesh/Zigbee/Thread nRF Connect SDK nRF MDK Softdevices Overview of Nordiac SDK’s At first, it is very confusing for me & can’t figure out which SDK is for what
How to do CAN Communication using Automotive Microcontroller S32K144 via ElecronicsV3(Non-Autosar Driver)
Dwell into this blog to know how to do CAN communication with automotive microcontroller. Start your journey to learn CAN communication protocol with simple DIY project using ElecronicsV3 board and CAN analyzer tool
Author: Kunal Gupta
Author