
Overview and motive
Objective is to:
- To get to know what is FlexCAN driver and its features.
- To Understand How to use FlexCAN Driver(software environment setup and chronology in software configuration)).
- FlexCAN Driver GUI explanation for configuring FlexCAN Peripheral.
- Relation of functions of FlexCAN Driver functions via FlexCAN peripheral features.
- In Depth Understanding of FlexCAN driver functions/data types, with questions like What and why?
- Chronology of APIs for using basic features of FlexCAN Peripheral for doing CAN communication(How and When?)
By basic features we mean the CAN transmission and reception via Mailbox and FiFo mechanism using polling&Interrupt method.
What is FlexCAN Driver
FlexCAN Driver are set of libraries which are used for using FlexCAN peripheral to do CAN communication via NXP S32K1xx Microcontrollers. Here by library, we mean a set of .h and .c files written in c language.
These set of FlexCAN libraries are:
- Library of FlexCAN Peripheral Hardware registers.
- Library for FlexCAN Peripheral Interrupt Handlers.
- Library for FlexCAN peripheral API’s.
- Miscellaneous files for FlexCAN.
Now in FlexCAN Driver there are 3 sets:
- FlexCAN_Ip.h/.c
- FlexCAN_Ip_Hw_Access.h/.c
- FlexCAN IP_Irq.h/.c
- 3 extra header files: FlexCAN_Ip_DeviceReg.h/FlexCAN_Ip_Types.h/FlexCAN_Ip_Wrapper.h:
The first one contains the function and data types through which different features of FlexCAN peripheral are used. Features like of sending data, receiving data, configuring message id filter table and etc. It contains functions like: FlexCAN_IP_Send(). FlexCAN_IP_receive, FlexCAN_IP_RXFIFO and etc.
The Second one also contains the functions and data types through which FlexCAN Peripheral registers. Are accessed. Kind of like Bare Metal codes of FlexCAN peripheral are written in this files. And the Functions of this file are used by FlexCAN_Ip.h/.c files.
Third one contains the function definition and data types for for IRQ handler of FlexCAN Peripheral
And the last one contains the misceeleneours Data types and macros for using flexCAN peripheral.
In our application code, we are just going to add FlexCAN_Ip.h header file to access the FlexCAN Driver in our code.
And these files are located in the root directory of S32 DS where software installtion of RTD package takes place.
FlexCAN Driver and Code Configuration tool relation.
Now for using the FlexCAN peripheral, there is a feature of code configuration tool in S32DS via which we can configure the FlexCAN Driver in Gui base. That is instead of writing code, we can confiure how to use FlexCAN Module by GUI presentation.
The code configuration tool in S32 Design Studio, generates the set of .c/.h files for FlexCAN peripheral. These are different from library files which I have explained above. In these generated files it defines and initializes some of the variables. These variables are then used by FlexCAN APIs in the application code.
This support of code configuration tool makes it easy for configuring FlexCAN module in easy way via GUI presentation and variables which are generated by code configuration tool are used as parameters in FlexCAN APIs to use them in application code.
So, in short to say, code configuration tool generates the values of some of the parameters that has to be send in FlexCAN Driver API.
Closure of FlexCAN Driver: There are number of files, functions and data types but for now we are going to concentrate on those which will be required for using FlexCAN in Standard CAN, in normal mode for transmitting and receiving via mailbox and FiFo mechanism.
In FlexCAN library there are number of functions and data types through which all the features of FlexCAN peripheral can be used. But we are not going to dwell into all functions and data types. We are just going to cover the functions and data types through which we can send and transmit can data via mailbox/rxfifo mechanisms. As this is the scope of this course and module, for other functions and features you can explore our Advance CAN Courses or can reach out to us privately,
Software to install to use FlexCAN Peripheral Driver
To use FlexCAN Peripheral Driver, we need to install following things in your Host Desktop/PC:
- S32 Design Studio IDE 3.4 or 3.5 (any will work though here, we are going to use S32 Design Studio 3.4)
S32K1 Real Time Drivers Version 1.0.0
S32 Design Studio 3.4
S32K1 Real Time Drivers Version 1.0.0
S32K1 RTD V1.0.0 is Software Stack for using NXP S32K1xx microcontrollers. It Contains Peripheral Driver library files for using the S32K1xx microcontroller peripherals. It supports all peripherals of S32K1xx MCU’s. This Software Stack contains 2 packages:
- Autosaur MCAL layer complaint and standard based peripheral driver files for S32K1xx MCU’s. It is Autosar 4.4.0 complaint.
- Non-Autosar based peripheral driver files for S32K1xx MCU’s. It is a collection of peripheral drivers designed to simplify and accelerate application development on NXP microcontrollers.
From Learning point of view and long-term skill development, having handson with Autosaur MCAL layer based peripheral driver file would be a good starting point. But as a fresher it might be more challenging to start with autosar standard. So
In this blog, we are going to explore Non-Autosar based peripheral driver for FlexCAN module. Further once having basic Handson with Non-Autosar, will explore Autosar MCAL layer based peripheral driver.
Refer to this blog/video to get to know how to install S32 Design Studio 3.4 and Install S32K1 Real Time Drivers v1.0.0. Also it is recommended to explore Code Configuration Tool and Project Creation Modules of S32 Design Studio IDE, so as to get understanding how to use S32 Design Studio throughout the learning cycle.
How to use FlexCAN Peripheral Driver
FlexCAN Driver can be used via S32 Design Studio Code Configuration tool which provides Graphical User Interface manner in S32 Design Studio IDE, through which we can generate the FlexCAN driver libraries and code automatically in our project. This thing makes it easy to develop applications fast and easy way. The Code Configuration tool generates 2 things:
- Library Files to use FlexCAN Peripheral.
- Configured parameters in the form of Data Types (structures, macros, arrays and etc.), which are used as input parameters in different functions of library files.
Chronology to follow for using FlexCAN Driver for doing CAN communication in our embedded software code:
- To select the pins to use as CAN_Tx and CAN_Rx for corresponding FlexCAN peripheral instance. This is done via Pins view in code configuration tool and then via port driver in the code.
- To configure the pins, selected in step 1 as CAN_Tx and CAN_Rx. This is done via Port GUI in MCAL section of Component view in code configuration tool and then via port driver in the code.
- To configure the clock configuration of corresponding FlexCAN Peripheral instance. This is done via Clock view in Code Configuration tool and then via Clock Driver in the code.
- To configure the CAN protocol configuration via FlexCAN Peripheral GUI in Driver section of Component view in Code Configuration tool and then via FlexCAN Driver in the code.
- To Configure Interrupts and DMA channels if using via Interrupt and DMA GUI in Driver section of Component view in Code Configuration tool and then via Interrupt-DMA Driver in the code.
These 5 steps will make the Embedded Software Project with all software files and code that is required to use the FlexCAN driver in our application code. Now according to our usecase and requirements, we can use FlexCAN Peripheral Driver Functions to do CAN communication.
In FlexCAN Driver there are number of functions, through which all features of FlexCAN peripheral can be used. Features which we have listed above. For now we are going to focus on how to use FlexCAN peripheral driver for doing CAN Communication in Normal Mode via Mailboxes and RxFIFO mechanism through Polling and Interrupts.
- Single MailBox Transmission polling: analyzing mailbox address and data writing on message buffer address
- Single MailBox Receiving polling: analyzing mailbox address and data reading on message buffer address
- Single MailBox Transmission Interrupts: IFLAG register setting to 1 and Interrupt handler invocation with analyzing mailbox address and data writing on message buffer address
- Single Mailbox Receiving Interrupt: Sending Mutiple external receiving messages and then showing interrupt invocation and message buffer address analzis, with no code on while loop().
- Multiple mailbox interrupt transmission: analyzing mailbox address and data writing on message buffer address and showing their priority order settings.
- Multiple mailbox interrupt receiving: analyzing mailbox address and data reading on message buffer address and configuring mailbox priroties
- CAN reception via FIFO polling: Doing CAN reception with default configuration of filter table
- CAN Receptin via FIFO Interrupt: Doing CAN reception with configuration of filter table for upto 8, 16 and x filter table elements in all three formats.
- CAN reception via MailBox and FIFO Interrupt receive process: Doing CAN reception with mailbox and FIFO in same example and configuring their different priorities via interrupts
- CAN communication via Mailbox transmission and FIFO Interrupt process:
- CAN Communication via Mailbox transmission/reception and FIFO reception Interrupt process:
Now for making the application, we need to know how to use the Functions and Data Types defined in libraries of FlexCAN Driver. Which functions to use? What parameters to send in those functions? In what chronology functions has to be called for using FlexCAN peripheral? How to use Code Configuration tool for configuring FlexCAN peripheral? Meaning of different GUI sections in Code Configuration tool for FlexCAN Peripheral.
GUI Configuration of FlexCAN Peripheral Driver
Explain in Video only!
Functions of FlexCAN Driver
In FlexCAN Driver there are number of functions, which support all features of the FlexCAN Peripheral. But as a beginner to start we are at first going to cover basic functions that provide functionality for doing CAN communication: transmission and reception of standard CAN data via MailBox and FiFo mechanism. We are going to cover this functionality practically. So as to follow the chronology to learn things in an order and further moving ahead on complex topics.
By basic features we mean the CAN transmission and reception via Mailbox and FiFo mechanism using polling&Interrupt method in Normal Mode.
For this functionality, we will be needing following kind of API’s/Functions:
- FlexCAN Peripheral Configuration and Enablement API’s.
- FlexCAN Peripheral Transmission and Reception API’s via mailbox
- FlexCAN Peripheral Transmission and Reception API’s via Rx FiFo.
Now for understanding these API’s working, thier is a thing. For the usage of functions we will be sending some paramaters in those functions and values of those parameters is generated by Code Configuration tool. And in some parameters have to be send by us. Lets explore functions now for better understanding.
Peripheral Configuration and Enablement API's
- FlexCAN_Ip_Init
- FlexCAN_Ip_Deinit()
- FlexCAN_Ip_SetStartMode()
- FlexCAN_Ip_SetStopMode()
Peripheral Transmission and Reception API's via Mailbox
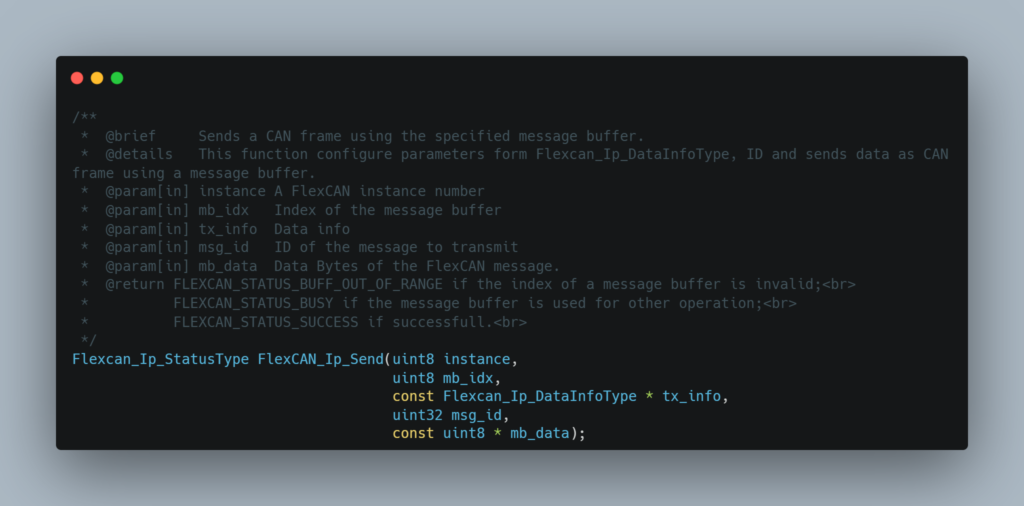
- FlexCAN_Ip_Send():
- FlexCAN_Ip_SendBlocking():
- FlexCAN_Ip_Receive():
- FlexCAN_Ip_ReceiveBlocking()
- FlexCAN_Ip_MainFunctionWrite()
Peripheral Reception API's via FiFo
- FlexCAN_Ip_ConfigRxMb()
- FlexCAN_Ip_RxFifo()
- FlexCAN_Ip_RxFifoBlocking():
- FlexCAN_Ip_MainFunctionRead()
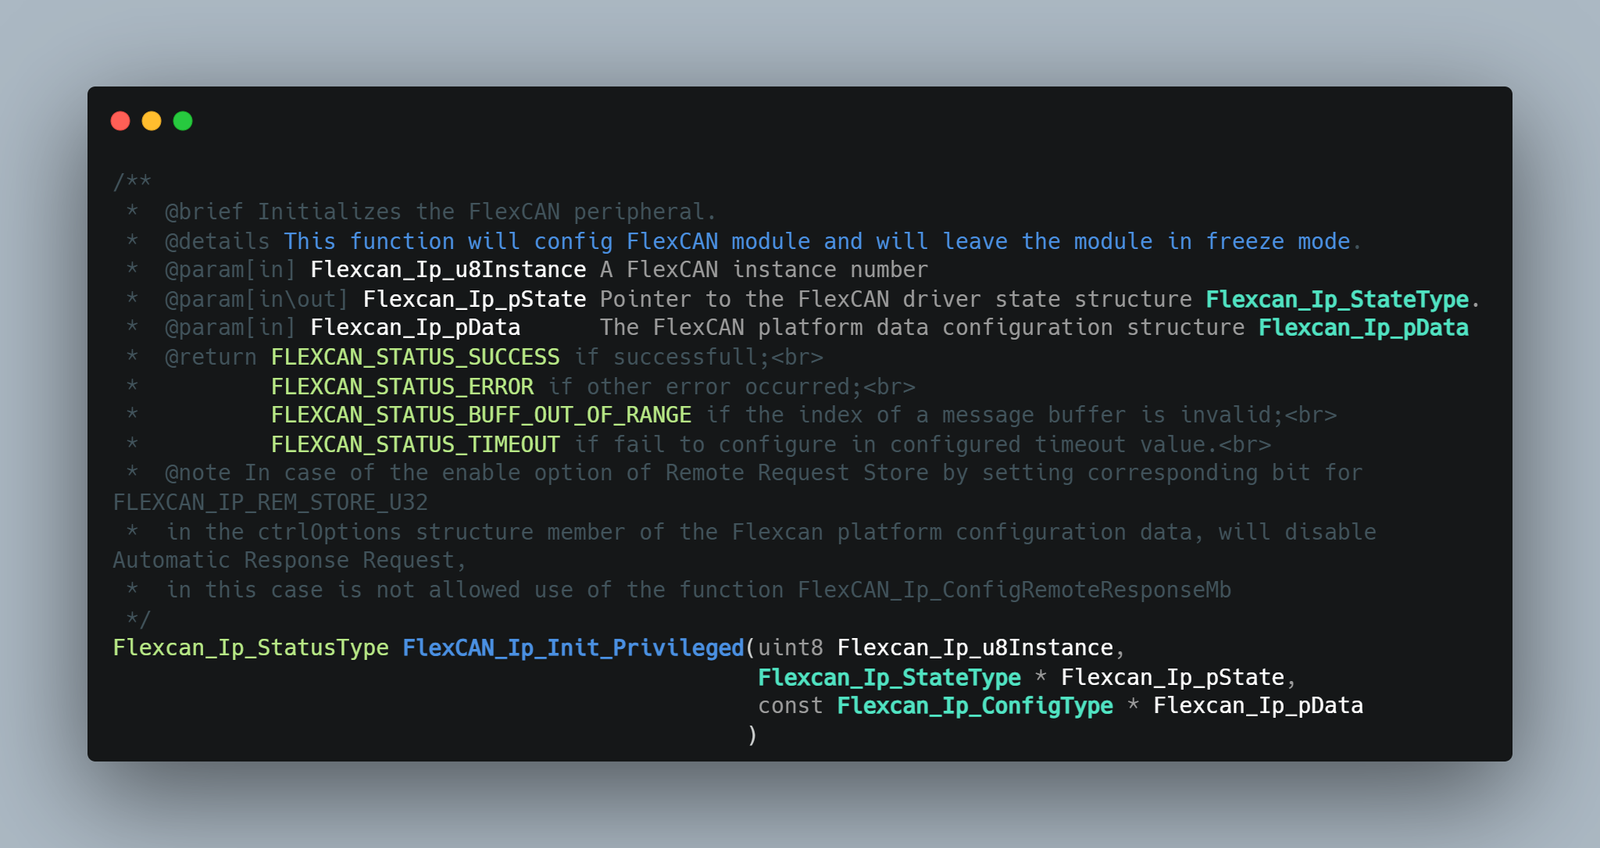
FlexCAN_Ip_Init
- FlexCAN_Ip_Init(): function is used to configure the FlexCAN Peripheral, according to the configuration that we have done in GUI and will leave the Peripheral in freeze mode.
It is macro defined function, which is a wrapper for FlexCAN_Ip_Init_Privileged(). FlexCAN_Ip_Init_Privileged() is the main function that does all the configuration and enabling of FlexCAN peripheral.
Mind Map of FlexCAN_Ip_Init():
How to use FlexCAN_Ip_Init()?
This function has 3 input parameters to send. One is of integer data type and other two are of structure data type. As shown in above snippet of function.
- FlexCAN_Ip_U8Instance: Instance number of the FlexCAN module which we are using. If we are using FlexCAN 0 then 0 value has to be sent, FlexCAN 1 then 1 and FlexCAN 2 then 2. This variable is of integer data type. The value for this parameter is automatically generated by the code configuration tool by the name of INST_FLEXCAN_i, as a macro defination: here i is the instance number.
- FlexCAN_Ip_pState: variable to log the state of FlexCAN peripheral while doing CAN Communication. This variable is an object for structure Flexcan_Ip_StateType and we send its pointer to the function. To know more in-depth about this variable, explore the data type Flexcan_Ip_StateType. The value to this is automatically defined by the code configuration tool in the generated file FlexCAN_Ip_Sa_BOARD_InitPeripherals_PBcfg.c
- Flexcan_Ip_pData: variable that holds the value’s according to which Flex CAN peripheral initialization and configuration has to be done. This variable is an object for the structure Flexcan_Ip_ConfigType. The value to this object variable is automatically defined and initialized as well by the code configuration tool in FlexCAN_Ip_Sa_BOARD_InitPeripherals_PBcfg.h file. To know more in-depth about this variable, explore the data type Flexcan_Ip_ConfigType.
So we just have to select which configuration we want for FlexCAN in GUI and it will automatically generate the required variable’s and initialize them to configured values, so as to initialize the FlexCAN Pheripheral.
Also, there are different modes in CAN protocol like: Normal Mode, Freeze Mode, Loop-Back, Listen Only and CAN FD Active Mode.We are going to cover Normal Mode which is general and basic mode.
FlexCAN peripheral support different low-power modes of operation too so as to consume less power in case of building low-power consumption applications. These are Module Disable, Stop and Pretended Network low-power modes. We are not going to use any low-power mode, as if now. We are going to cover other low-power mode of operation in subsequent blogs after doing the basic practical HandsOn.
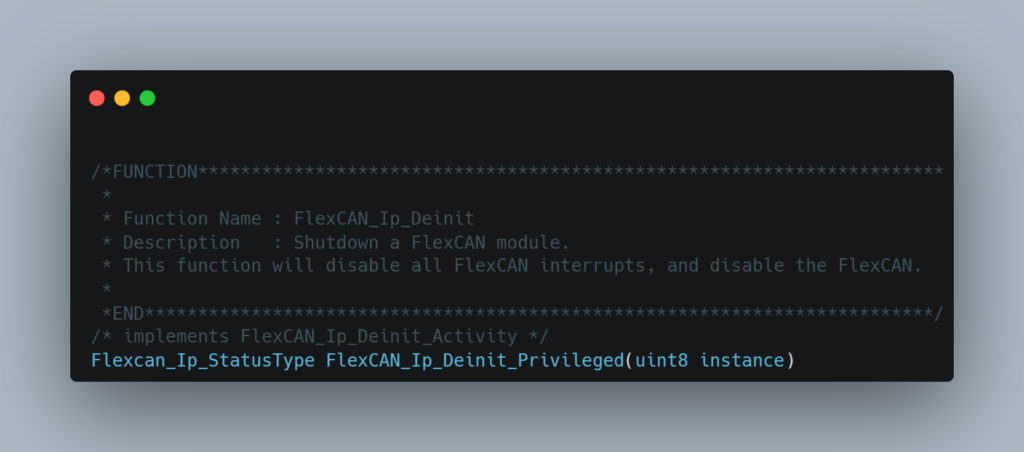
FlexCAN_Ip_Deinit
- FlexCAN_Ip_Deinit():This function is used to deinitialize the FlexCAN peripheral and disable all of its interrupts.
It is macro defined function, which is a wrapper for FlexCAN_Ip_Deinit_Privileged(). FlexCAN_Ip_Deinit_Privileged() is the main function that does all the configuration and enabling of FlexCAN peripheral.
Mind Map of FlexCAN_Ip_Deinit():
How to use FlexCAN_Ip_Deinit()?
This function has 1 input parameters to send. That is of integer data type
- FlexCAN_Ip_U8Instance: Instance number of the FlexCAN module which we want to denitialize. If we are using FlexCAN 0 then 0 value has to be sent, FlexCAN 1 then 1 and FlexCAN 2 then 2. This variable is of integer data type. The value for this parameter is automatically generated by the code configuration tool by the name of INST_FLEXCAN_i, as a macro definition: here i is the instance number.
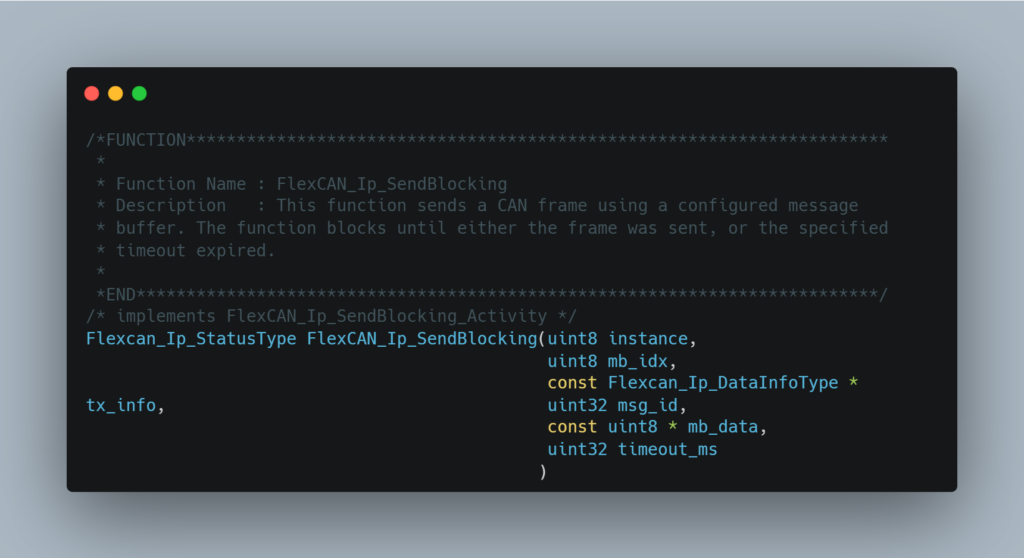
FlexCAN_Ip_SendBlocking()
FlexCAN_Ip_SendBlocking(): This function is used to send the CAN frame via mailbox mechanism using polling method. This function is defined in FlexCAN RTD library file: FlexCAN_Ip.c
Mind Map of FlexCAN_Ip_SendBlocking()
How to use FlexCAN_Ip_SendBlocking()?
Make sure that FlexCAN PEripheral is initialized and corresponding FlexCAN peripheral pins are configured.
This function has 6 input parameters, out of 4 are of integer data type and 1 is pointer to integer data type and is 1 in pointer to structure data type.
- instance: Instance number of the FlexCAN module which we are using. If we are using FlexCAN 0 then 0 value has to be sent, FlexCAN 1 then 1 and FlexCAN 2 then 2. This variable is of integer data type. The value for this parameter is automatically generated by the code configuration tool by the name of INST_FLEXCAN_i, as a macro defination: here i is the instance number.
- mb_idx: Index of the message Buffer. Here we define to which mailbox we want to write the CAN data through which transmission can be done. The value for this parameter is defined by user in application code. Either Macro defined parameter can be send or a integer data type. the value which we send should be in range of 0 to max mailboxes which we have configured in GUI. And in case of Rx FIFO the value of message buffer should be after the mailbox number left after FIFO buffer and filter table occupied.
- tx_info: This variable holds the Information about the CAN Frame which we are going to send. This variable is an object of Structure Flexcan_Ip_DataInfoType. And to use in fucntion, we have to send the pointer of the object. The value for this variable is defined and initialized by user in application code. Refer to structure data type of this variable to know how this variable hold the information about CAN frame.
- msg_id: The message ID of the CAN Data that has to be send. This variable is of uint32 type, which is equal to message id value of the corresponing CAN data that has to be transmitted. This variable is defined and initialized by user in application code.
- mb_data: pointer of the uint8 data type which holds the payload value of the CAN frame. This variable is also defined and initialised by user in application code.
- timeout_ms: uint32t data type input parameter. This value refers to the timeout value, after which it should come out if data is not transmitted. This variable is also defined and initialized by user in application code.
Usage example of FlexCAN_Ip_SendBlocking()
FlexCAN_Ip_Send()
FlexCAN_Ip_Send(): This function is used to send the CAN frame via mailbox mechanism using interruot method. This function is defined in FlexCAN RTD library file: FlexCAN_Ip.c
Mind Map of FlexCAN_Ip_SendBlocking()
How to use FlexCAN_Ip_SendBlock()?
Make sure that FlexCAN Peripheral is initialized and corresponding FlexCAN peripheral pins are configured.
This function has input parameters, out of 3 are of integer data type and 1 is pointer to integer data type and 1 is a pointer to structure object.
- instance: Instance number of the FlexCAN module which we are using. If we are using FlexCAN 0 then 0 value has to be sent, FlexCAN 1 then 1 and FlexCAN 2 then 2. This variable is of integer data type. The value for this parameter is automatically generated by the code configuration tool by the name of INST_FLEXCAN_i, as a macro defination: here i is the instance number.
- mb_idx: Index of the message Buffer. Here we define to which mailbox we want to write the CAN data through which transmission can be done. The value for this parameter is defined by user in application code. Either Macro defined parameter can be send or a integer data type. the value which we send should be in range of 0 to max mailboxes which we have configured in GUI. And in case of Rx FIFO the value of message buffer should be after the mailbox number left after FIFO buffer and filter table occupied.
Usage example of FlexCAN_Ip_Send()
Data Types
Basic and Important Data Types:
//Enums
- Flexcan_Ip_RxFifoTransferType
- Flexcan_Ip_RxFifoIdFilterNumType
- Flexcan_Ip_RxMaskType
- Flexcan_Ip_FdPayloadSizeType
- Flexcan_Ip_ModesType
- Flexcan_Ip_MbStateType
- Flexcan_Ip_EventType
- Flexcan_Ip_ErrorIntType
- Flexcan_Ip_MsgBuffIdType
- Flexcan_Ip_RxFifoIdElementFormatType
- Flexcan_Ip_StatusType
User Data Types:
- Flexcan_Ip_TimeSegmentType
- Flexcan_Ip_PayloadSizeType
- Flexcan_Ip_MsgBuffType
- Flexcan_Ip_MBhandleType
- Flexcan_Ip_StateType
- FlexCAN_Ip_CallbackType
- FlexCAN_Ip_ErrorCallbackType
- Flexcan_Ip_ConfigType
- Flexcan_Ip_IdTableType
- Flexcan_Ip_DataInfoType
Callback functions:
- FlexCAN_Ip_CallbackType
- FlexCAN_Ip_ErrorCallbackType
Important macros:
- FLEXCAN_IP_FEATURE_HAS_PRETENDED_NETWORKING
- FLEXCAN_IP_FEATURE_HAS_DMA_ENABLE
- FLEXCAN_IP_FEATURE_HAS_TS_ENABLE
- FLEXCAN_IP_FEATURE_HAS_ENHANCED_RX_FIFO
This function has 6 input parameters, out of 4 are of integer data type and 1 is pointer to integer data type and is 1 in pointer to structure data type.
- instance: Instance number of the FlexCAN module which we are using. If we are using FlexCAN 0 then 0 value has to be sent, FlexCAN 1 then 1 and FlexCAN 2 then 2. This variable is of integer data type. The value for this parameter is automatically generated by the code configuration tool by the name of INST_FLEXCAN_i, as a macro defination: here i is the instance number.